
Well, hello, nail polish. NICE TO SEE YOU, OLD FRIEND!
Now that I have a little more time to do something other than an occasional speed mani, I’ve been busting out the accouterments from the new Nail Beautifiers collection in the Sally Hansen Color Therapy Line.
Color Therapy is Sally Hansen’s line of moisturizing polishes infused with argan oil, and I started wearing them a lot after “the gel mani incident.” My nails needed some serious TLC, so I babied them for a couple months and only wore bare nails or Color Therapy until my nails recovered back to their former strength.
There are six treatments in the new Nail Beautifier family, including three base coats, two top coats and a Nail Cuticle Serum.

If you’re washing your hands 24/7 like I am…
The Nail Cuticle Serum ($8.99) is THE STUFF. You can use it on bare or polished nails — just apply to the cuticles and nail tips and massage until absorbed. It’s a thick serum, and it isn’t oily, so you aren’t left with slippery, greasy fingers afterwards.
I keep it on my desk and apply it whenever I get a chance, and ever since I’ve been doing this, my cuticles (which had been visibly dry and thirsty and came this close to going full-on raggedy) look and feel so much better.
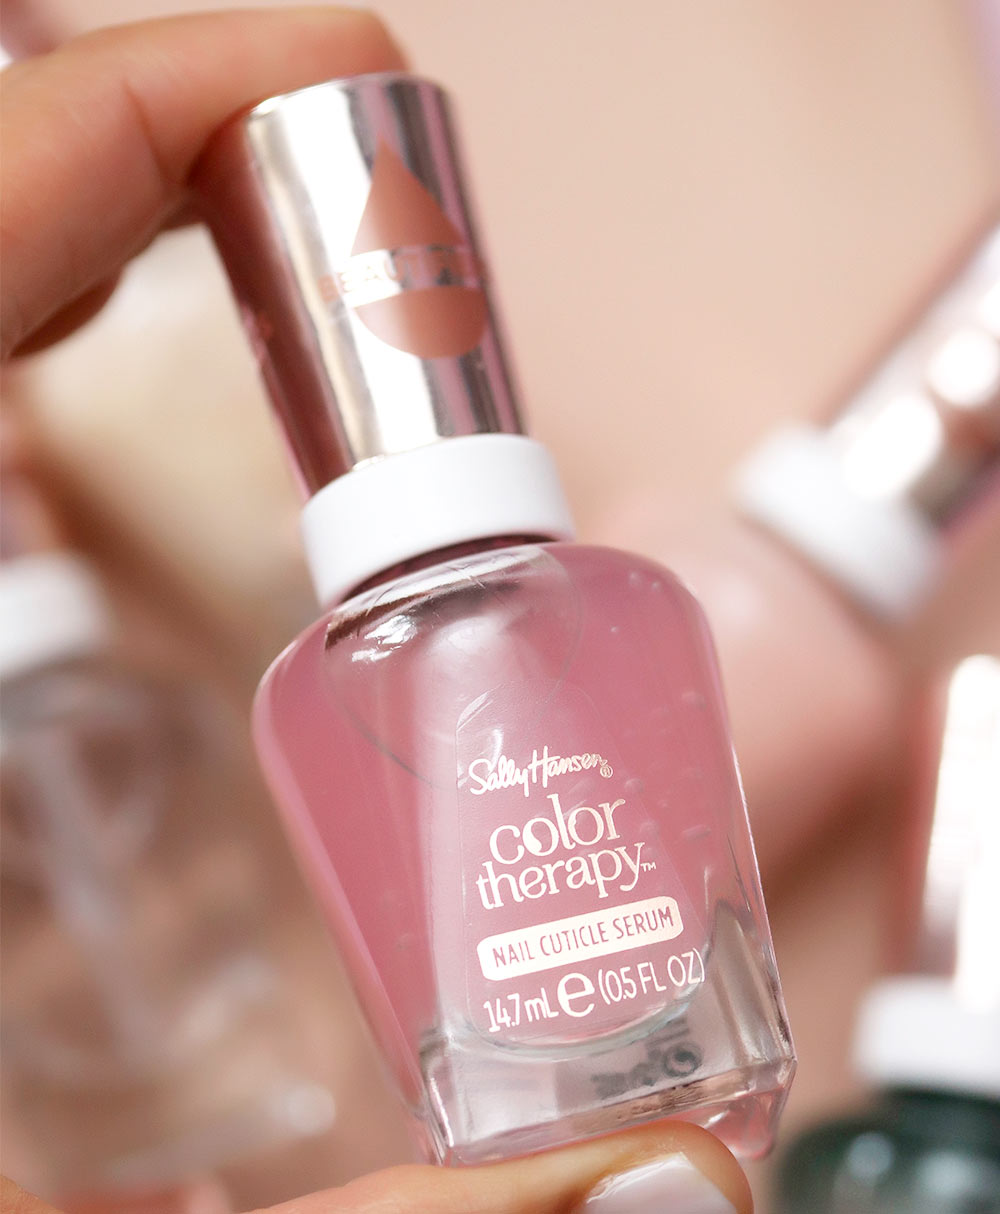
If you happen to see this online or while you’re out, grab it. Your cuticles will send you a secret love letter ❤️?️ via carrier pigeon declaring their undying affection for your thoughtfulness.
All about the base
If you have some serious ridges like I did after the disastrous gel mani incident, then the Nail Corrector ($8.99), which smooths out dips and drops on the surface of your nails, is for you. It looks like a peachy cream in the bottle, but it applies as a very sheer, barely-there pink.
Do your nail tips chip and split easily? If so, the Strengthening Base Coat ($8.99), which, like the Nail Corrector, looks tinted in the bottle but goes on clear, would be a good choice. Added bonus: It doubles as a top coat in a pinch.
If you’re lucky enough to have healthy nails, grab the Nail Primer ($8.99). It irons out the nails surface just like the Nail Corrector but isn’t as aggressive with the smoothing.
Top it off
Two new top coats reinforce the strength of your nails and the durability of your mani while locking down your nail color. I’m a fan of the High Gloss Top Coat ($8.99), which has a reflective gleaming, glossy shine (so it looks wet even when it’s dry).
Some of my nails tend to split, so I’ll bust out the Strengthening Top Coat ($8.99) and use it on them for added protection.
Your friendly neighborhood beauty addict,
Karen
P.S. On my #stressbaking to-do list this week: SCONES.
I made some terrible ones over the weekend that were just dry and dense and gross and totally inedible.

Do you have a fool-proof scone recipe or any suggestions? Do tell.
The cuticle serum sounds really good right about now! :]
Yes, I do have suggestions for the scones, you must use heavy cream. Don’t try to substitute with anything else. Heavy cream is essential. Also don’t overwork the dough.
I may be doing extra manicures myself. The paper is laying people off this week. I find out either tomorrow or Thursday if it’s a full layoff or a partial layoff. Either way, I’m freaking the F out.
Partially because they’ve ordered me to work from the home the past two weeks, which has just been all kinds of weird and I don’t really like it.
But if I’m here and I don’t have a job to do? Ooooh, boy.
Hang in there chiquita. Oh and my oven broke tonight so I can’t even stress bake until we get the part we need. It has to be shipped I think!!!!!
I hear you on the cuticles! I’ve been moisturizing like crazy, too. I got this cute, little 2 pack of Brazilian Bum Bum jars (Sephora b’day free gift, I believe) and have been keeping them close by. This is Day 3 of working from home and I’m still trying to find the right space. We have an office but it’s upstairs and chilly and cluttered with bills and personal stuff. So I’m alternating between the living room chair and dining room table. Neither is too hot for my neck and shoulders.
I’m sorry about the scones and don’t have any advice on that front. They’re not really my thing. But, as you know, baking will have it’s share of disasters. You’ll get it next time! 🙂
I hope you’re all doing well under the circumstances!
You could grate frozen butter and refreeze for 10 minutes while you gather the other ingredients. I tried that once and liked the texture /end result so I do that. I second heavy cream for the scones. Like a biscuit, don’t overwork the dough. King Arthur Flour has a blog and so many different recipes.
I never knew scones could be so delightful until my local bakery had samples (pre-virus LOL) of a chicago-style scone. Omigosh it was SO good I bought some immediately and have never turned back. I had never even given a scone a second glance but THIS was life changing!! Good luck with perfecting your recipe!
And happy Wednesday!!
Aren’t scones by definition somewhat dry and dense, lol? I will have to try that cuticle cream. I am pretty dedicated to my Essie Gel Couture though.
Believe it or not, some scones light with a lot of air when you bite into ’em. There’s a bakery my town and they do this using apparently some kind of powerful dark magic, LOL! The ones I made were a brick!
I have a scone recipe . It’s for 100 people . My friends father was a navy cook ….
Anyway since social distancing I clipped down my nails and toes .
Maybe I’ll just do my own mani- pedi from now on ,,
I’ve been moisturizing after almost every hand wash (except when I’m cooking). And my cuticles are rock hard and my nails are splitting vertically. Sigh. I had two of the Color Therapy polishes from the fall 2018 collection. Bronze Reflection and Falling Deep. Every time I applied them I could not stand the smell of them. To my nose they smelled different than other polishes. I ended up tossing them and it broke my heart because they were such beautiful “me” colors. But ugh! Things have to smell good for me to use them.
I think you’ve noticed some recurring advice for your scones: Use cold heavy cream and butter and don’t overwork the dough. As with piecrust and biscuits, you want those tiny specks of cold butter to lighten the dough as it bakes. Also, don’t over-bake them. They should be steaming hot when they come out of the oven; not dried out. Fresh from the oven, they should have a tender and moist crumb. A light and fluffy scone with a cup of good tea is one of life’s little pleasures.
I’ve been baking scones for over 50 years and haven’t bothered with an actual recipe in decades so I can’t help you much with that. As you know, baking is not just a science (weights, measures, etc.) it is also an art (feel, look, etc.)
You’ll get the hang of it.
Here is a scone recipe that’s always worked for me. Gluten free Clementine chocolate scones. One cup gluten-free all-purpose flour, 1 cup almond flour, 1/4 cup sugar, plus 2 teaspoons sugar, divided. Zest of one orange, 2 teaspoons baking powder, 1/2 teaspoon baking soda, 1/4 teaspoon salt. 5 tablespoons chilled butter, diced. One large egg. 3 tablespoons orange juice, 1/2 teaspoon vanilla, 1/3 cup dark chocolate chunks. Preheat oven to 350. Line baking sheet with parchment paper. In a large bowl whisk together flours, Gluten free Clementine chocolate scones. One cup gluten-free all-purpose flour, 1 cup almond flour, 1/4 cup sugar, +2 teaspoons sugar divided. Zest of one orange, 2 teaspoons baking powder, 1/2 teaspoon baking soda, 1/4 teaspoon salt. 5 tablespoons of chilled butter, diced. One large egg. 3 tablespoons orange juice, 1/2 teaspoon vanilla, 1/3 cup dark chocolate chunks. Preheat oven to 350. Lined baking sheet with parchment paper. In a large bowl whisk together flours, Sugar, zest, baking powder, soda, and salt. Using a pastry cutter, cut in butter until mixture resembles coarse crumbs. Stir in egg, orange juice and vanilla until it all comes together. Stir in chocolate. Turned out onto prepared baking sheet and pat into an 8 inch circle. Score into eight wedges with a large knife. Bake 18 to 22 minutes, until edges are golden and scones are just barely firm. Sprinkle with remaining 2 teaspoons of sugar. Cool 20 minutes. Cut along score marks. Makes 8. ❤️Thanks for your fun blog and recommendations for sally Hansen nail polishes, I can’t wait to try them.
I have the perfect scone recipe: it’s called King Arthur Flour scone mix. ? As much as I love a serious baking challenge and prefer baking from scratch, I’ll use a KAF mix if I know there’s no way I can beat it. (But this only applies to KAF mixes! Unapologetic baking snob, right here.)
I’m still working (from home) but have been using the flexibility of being at home to try to get my cuticles, hands, and feet looking better after winter. I bought little refillable plastic containers with a built in applicator brush and filled them with vitamin oil for my cuticles and nails and have been heavily moisturizing my feet and hands (especially with all the hand washing). I’ll have to check out this nail serum!
Good idea to give your feet some TLC as well. I haven’t been so good about that… I needed the reminder, so thank you!
Have you worn any fun makeup for your meetings lately?
I put on a new red lipstick for work today! Also some fun rainbow sunglasses I had to take off because I needed my normal sunglasses ?
I like these scones. Just don’t overwork the dough, and bake them right after you form the dough so the butter doesn’t melt. https://smittenkitchen.com/2010/10/apple-and-cheddar-scones/
Well, these sound delightful, like the perfect combo of savory and sweet (my favorite thing).
They really are delightful! I hope you enjoyed the savory sweet yumminess!
Not sure where I got this recipe, but it’s never failed.
Featherlight Scones
3 c. AP flour
1 T. baking powder
1/2 t. baking soda
1/2 t. salt
1 c. cold butter
1 egg
1 c. plain yogurt (Greek or regular is fine)
1/2 t. vanilla
1/2 c. dried fruit (optional)
2 t. milk
sugar for dusting
Combine dry ingredients. Cut in butter until the mixture resembles coarse crumbs. Mix egg and vanilla into yogurt, add to flour mixture, stir until just combined. If you want to add dried fruit, add about 1/2 c. before mixture comes together. Turn onto a floured surface, knead gently 6-8 times. Pat into a 9 inch circle. Brush top with milk and dust with sugar. Cut into 8-12 wedges depending on desired serving size. Bake on ungreased sheet 12-15 minutes at 425 F. Should be golden brown.
Thank you! I have a question for you. Does it matter of the yogurt is non-fat? That’s the only kind I have in the house right now. I’m guessing full-fat yogurt is better.
I don’t think it really matters. I think I’ve made this with nonfat Greek yogurt. Probably haven’t ever used nonfat regular yogurt.