
In the interest of fairness, seeing as how we have Valentine’s Day to celebrate lurve, and Galentine’s Day for your gal pals, shouldn’t there also be a holiday to commemorate V-Day for cat lovers and our cats? Like Feline-en-tine’s Day? Or Cat-en-tine’s Day?
Ooh! — I’ve got it. Meow-entine’s Day! ? ? Happy Meow-entine’s Day, fellow cat ladies, LOL!
Valentine’s Day is a few weeks away, a fact that occurred to me at 7:55 p.m. the other night at See’s Candy (5 minutes before closing), where I went on an emergency last-minute chocolate run.
They had their heart-shaped candy boxes on full display, and it was like a sudden cocoa-infused wake-up call that this is a perfect time for romantic, soft makeup looks. I think this monochromatic peach one would be great for a daytime date, or an evening date, or a date that goes from day to night, ooh-la-la!

Why I ? monochromatic makeup
Because it takes the aspect of color coordinating, and figuring out if this purple goes with that bronze, or if this pink goes with that teal, out of the picture and makes it easy to use multiple (but related) colors together (i.e., so you don’t have to think too hard).
But I really ? monochromatic makeup with a twist!
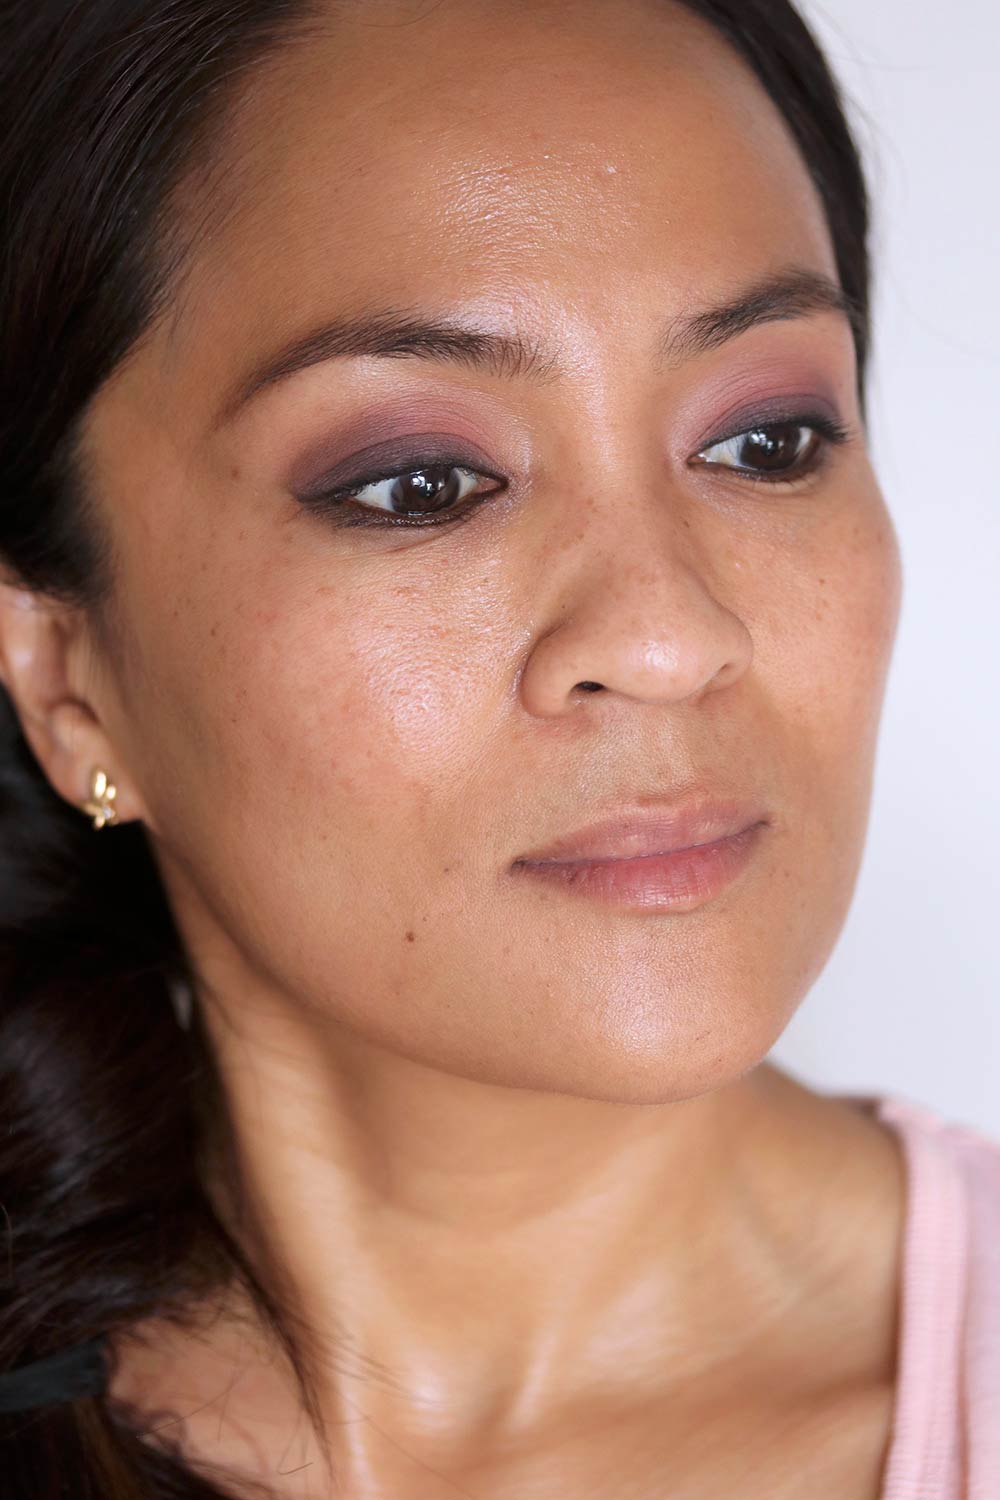
Instead of just being a peach-on-peach-on-peach party on the eyes, cheeks and lips, this look also relies on subtle transitions and different cream and powder textures, matte and satin finishes, and varying levels of coverage and intensity.
On the eyes, matte and satin powder eyeshadows are layered on top of a cream shadow, and the cheeks and lips are both sporting the same peach color and cream finish, except that the cheeks are sheer, and the lips are opaque. And the creaminess of the blush and lipstick also plays off the matte areas of the skin.
Sheer skin for balance
My foundation is purposefully sheer in this look because, with all of the drama happening on my eyes and the opaque lip, I feel like the face, cheeks and lips need to dial it back a bit to keep everything looking balanced.
A 15-minute look from start to finish
The choice to do sheer skin is also a timing thing, because I’m still really into makeup looks that I can finish in 15 minutes or less, and doing sheer skin saves lots of time and lets me spend most of it on my eyes.
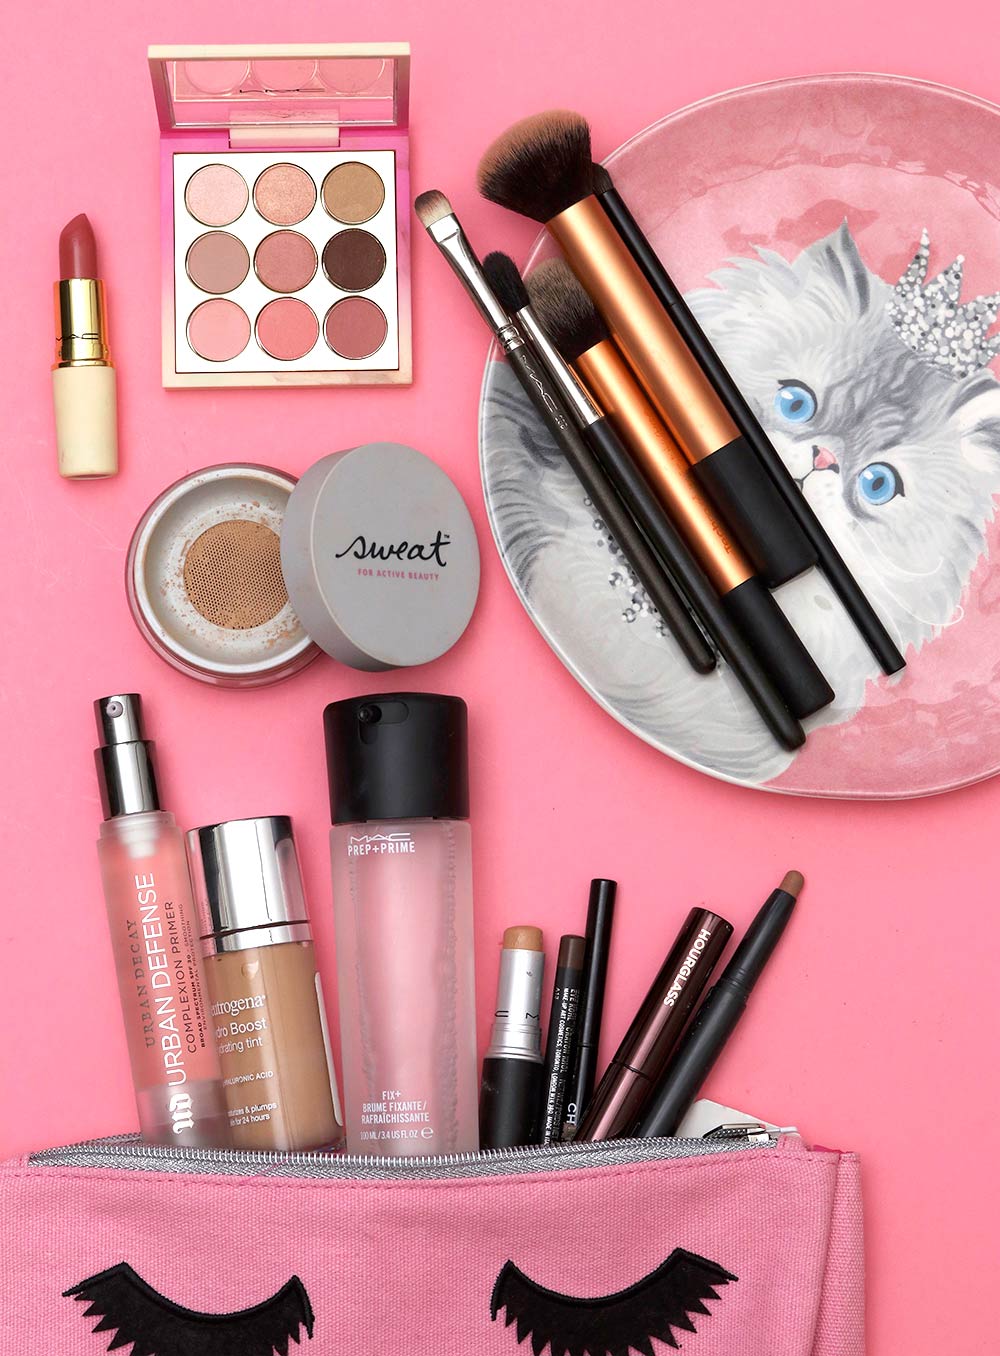
What you’ll need
Here are the products I used…
FACE PRODUCTS
- Face primer (Urban Decay Urban Defense Complexion Primer)
- Sheer face tint, or a CC or BB cream (Neutrogena Hydro Boost Hydrating Tint in Honey)
- Makeup setting spray (MAC Fix+)
- Powder foundation (Sweat Cosmetics Mineral Foundation in 200)
- Concealer for your under eye area, if you want (MAC Matchmaster Concealer in 4)
- Cream peach lipstick (MAC Lunar New Year Lipstick in Good Health, an LE shade available now online and at select MAC counters)
EYE MAKEUP
- Brow gel, either clear or a color that matches your brows (Hourglass Arch Brow Volumizing Gel in Warm Brown)
- Cream stick shadow similar to your skin tone (MAC Pro Longwear Waterproof Colour Stick in Sand Bar)
- Three powder eyeshadows: a matte peach eyeshadow, a matte taupe and satiny bronzy brown (MAC Lunar New Year Eye Shadow X9 in Luck and Fortune, an LE palette available now at select MAC counters)
- Two pencil eyeliners: a black and a bronzy brown (Chanel 88 Noir Intense and MAC Costa Riche)
- Mascara (Tarte Lights Camera Lashes)
Let’s get started
First, you’ll be bouncing back and forth between working on your face and working on your eyes, because when every minute/second counts, you gotta multitask. But it won’t be stressful or scary, I promise. 🙂
1. Apply a face primer
On that note, start by applying a face primer, and I like smoothing primers that mellow out my pores because I’m a 40-something gal, and I could use a little help in that department.
As you do your eyes, your face primer will have time to sink in and dry, so, later, when you apply your face products, you won’t have any wet spots from the primer, ensuring that your face tint, cream blush, etc. will look even.
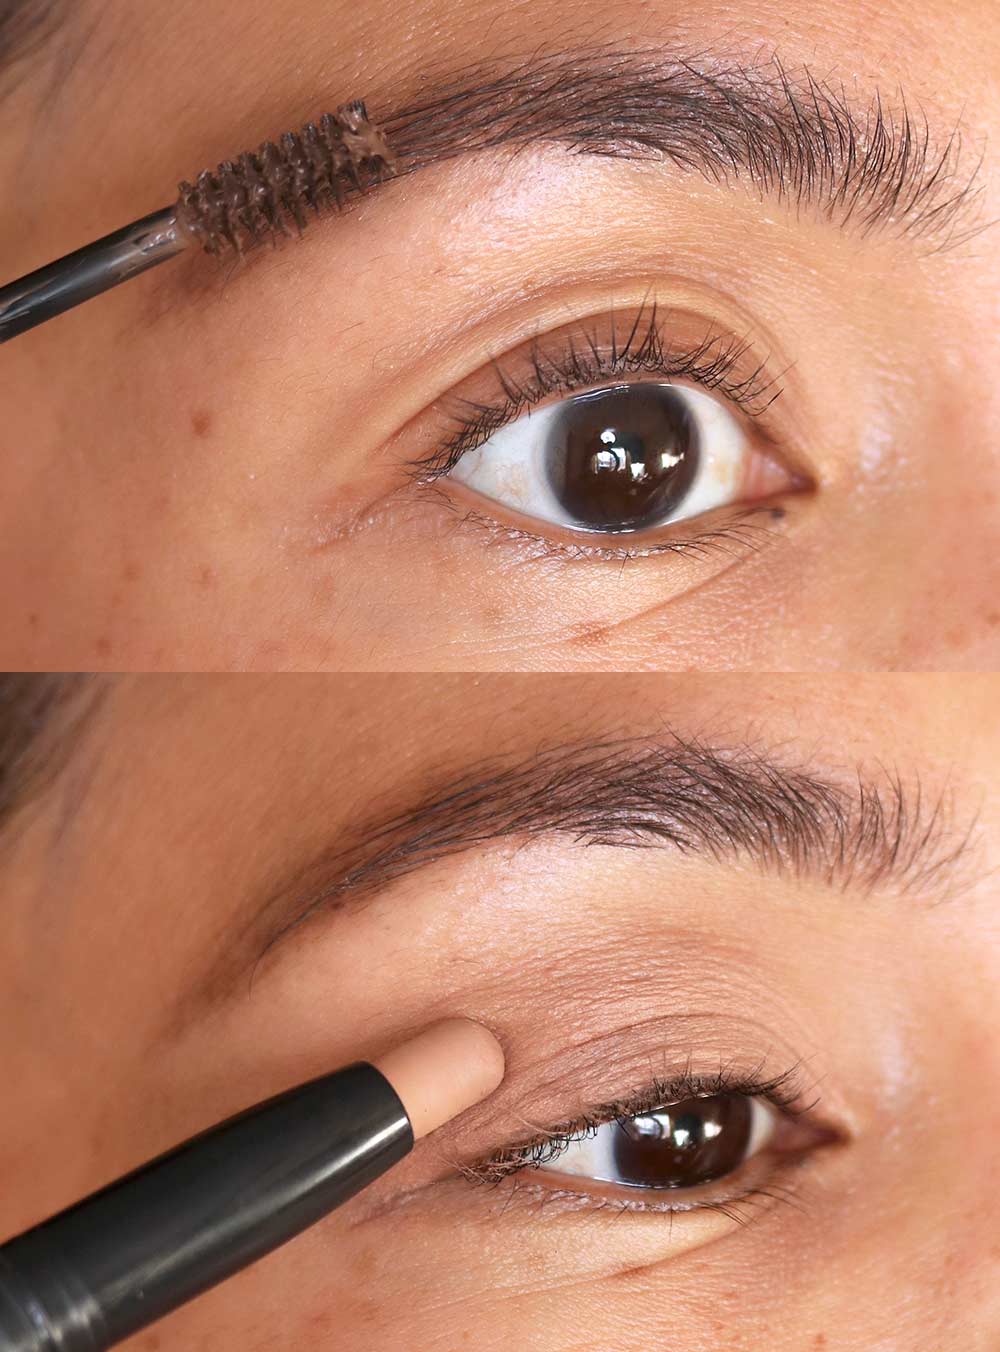
2. Fill in your brows with gel
OK, eyes! Begin by filling in your brows with a brow gel. I like the softer, less structured look of a brow gel (vs. a pencil) for this particular style of makeup because I think it suits soft, romantic makeup well.
3. Apply a cream shadow on your lids
Take a creamy shadow stick in a shade similar to your skin tone, and apply it all over your lids, blending with your fingers or a brush.
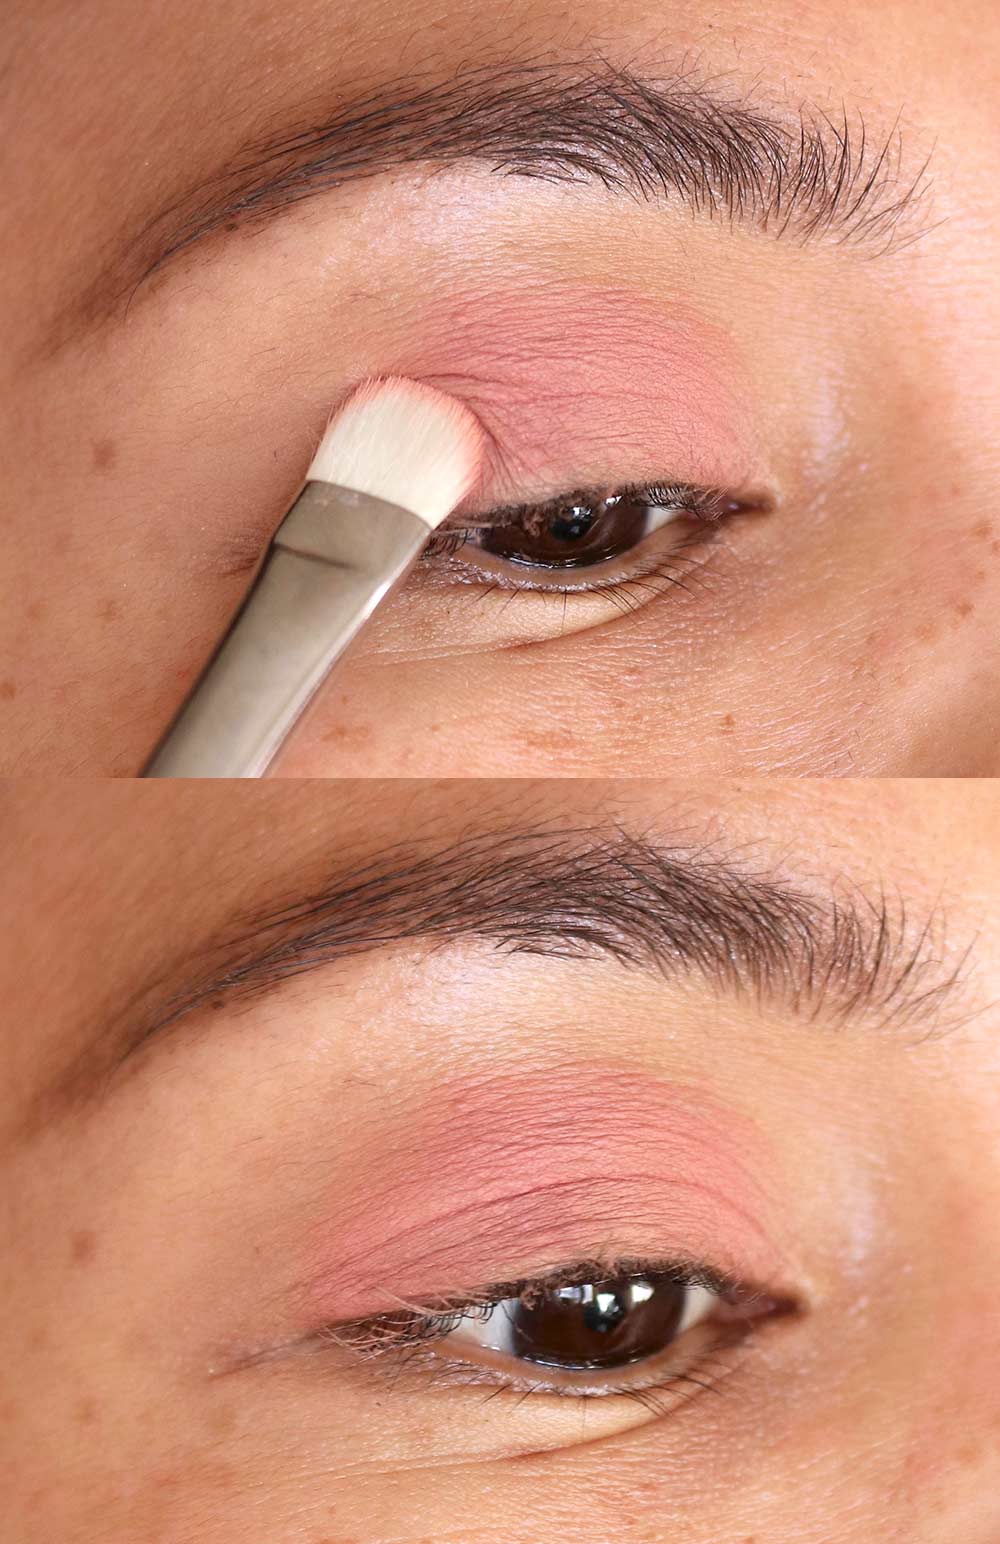
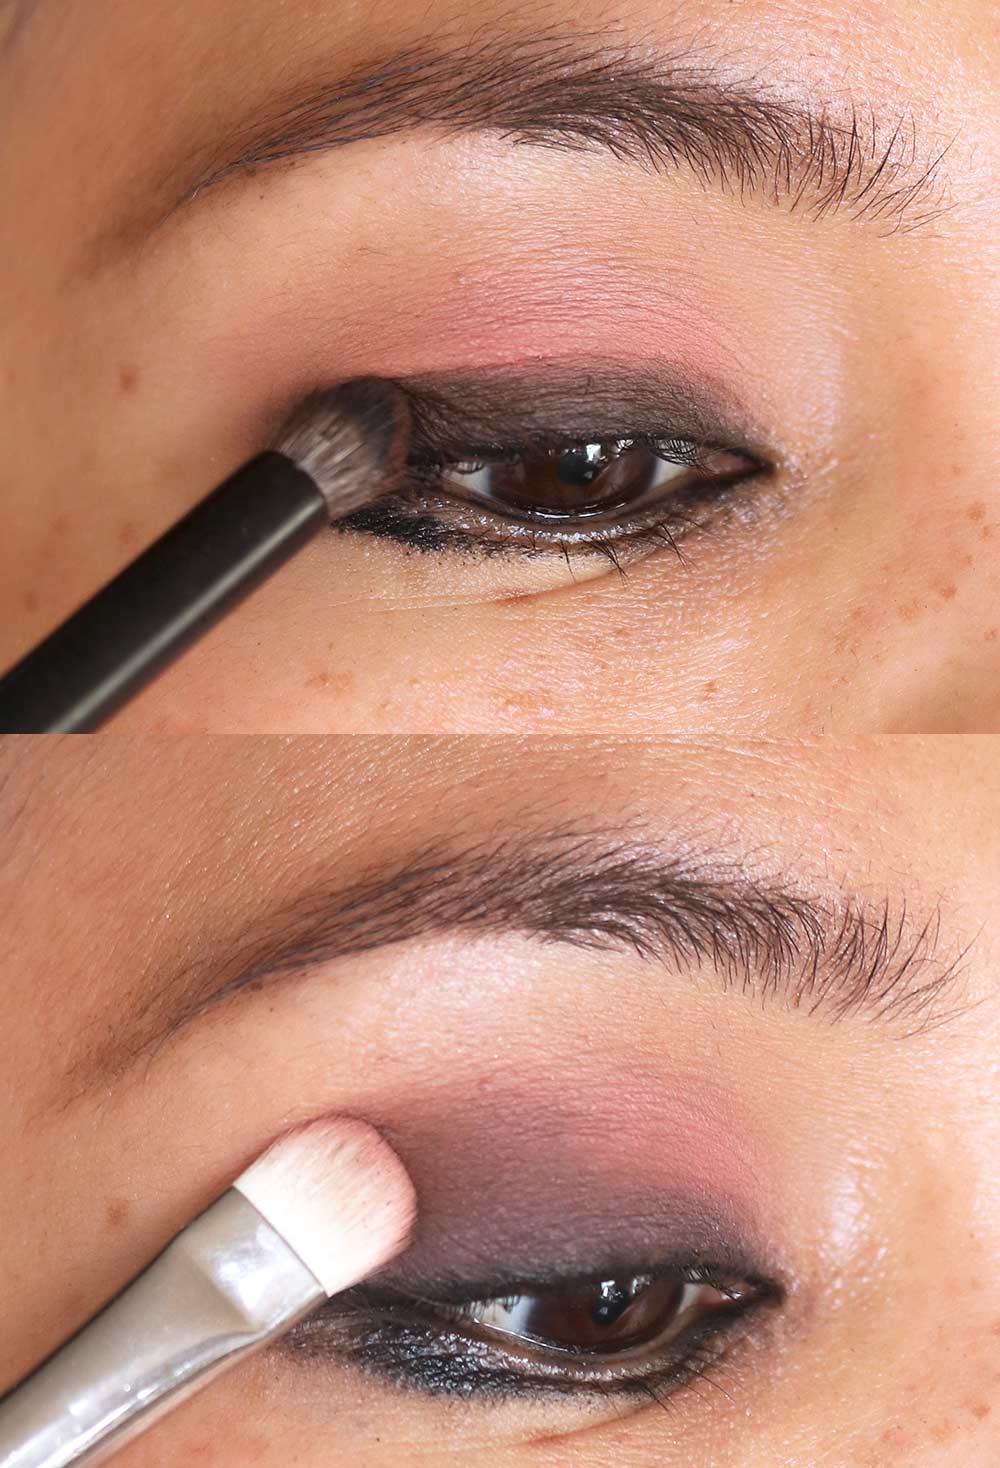
4. Mix your peach and taupe powder eyeshadows, and apply them to lids
Now, load a flat eyeshadow brush with the matte peach and matte taupe shadows… Don’t put it your lids yet, though!
First, mix the shadows on the back of your hand, and gently push the pigment into the bristles of your brush to distribute it evenly in/on the brush head. Next, apply the mix directly on top of the cream shadow on your lids, starting at your lash line and moving up into the crease.
You can take it up as far as you want. It’s totally up to you. For my eyes, and because I have a semi-hooded eye situation happening, I like to do a half moon shape.
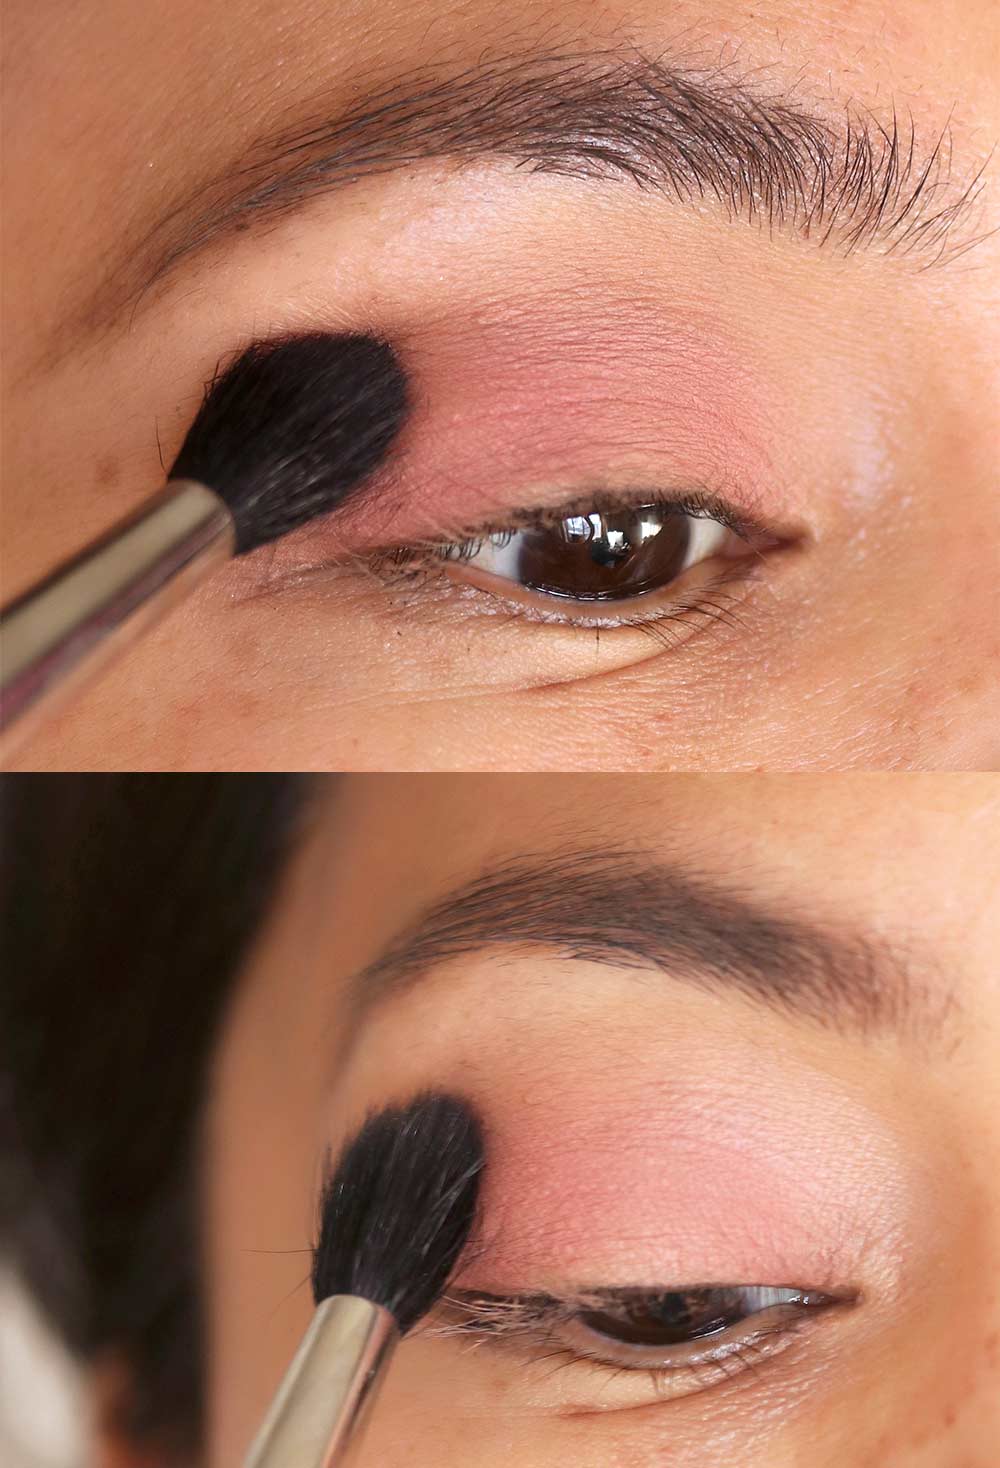
5. Blend out the edges of the eyeshadow on your lids using a tapered blending brush loaded with taupe matte eyeshadow
Next, take a tapered eyeshadow brush, load it with your taupe matte shadow, and blend out the edges of the peach/taupe mix you just applied.
(Tip: Use a light touch when you do this so you aren’t just pushing the shadow into your skin and making the blending tougher than it needs to be.)
6. Line your upper lash and water lines with black pencil liner
Note: It doesn’t have to be neat.
7. Smudge the black liner on your upper lash line using a smudge brush loaded with a satiny brown eyeshadow
I usually like to smudge it into the outer corner and my outer crease to sort of create the illusion of a deeper set eye.
8. Using your flat eyeshadow brush again, load it with your peach/taupe eyeshadow mix, and pat it directly on top of the smudged liner to soften the edges and blend it into your lid color
At this point, some of the black liner will have transferred down onto your lower lash and water lines, but don’t worry about cleaning it up. Leave it there ’cause you’re going to use that.
9. Line your lower lash and water lines with your brown pencil liner
And again, this doesn’t have to be neat. Just layer it directly on top of the black liner.
10. Blend the black and brown liners together on your lower lash line by running the smudge brush you used earlier (without any additional product) along your lower lash line

11. Gently run the flat eyeshadow brush you used earlier (without putting any additional product on it) along your lower lash line
The leftover eyeshadow on the bristles will soften and diffuse the edge of the liner.
If your lower lash line color is creeping down into your under-eye area more than you’d like, clean the edges with a little cream on a Q-tip, and scoot them closer to your lash lines.
I tend to keep the liner pretty close to my lower lashes because the farther you drag it down, the more rock ‘n’ roll this look goes, which is fine, depending on what you want, but I wanted this version to be more romantic than bad-@ss.
12. Finish the eyes with mascara
You’re almost done! Before we continue, check your time… If you gave yourself 15 minutes, you should have about 5 left for the rest of your look.
Yes, the rest of the steps are totally doable in 5 minutes. 🙂
13. Apply and blend a face tint
Remember the face primer you applied at the beginning? It should be dry now (hopefully), so apply your sheer face tint either all over, or just on the areas where you want some extra coverage, and blend it with your fingers, a sponge or a brush.
The tint I’m using here has a doe foot, so I use it to draw messy stripes on my cheeks, forehead, nose — basically all over. Then I wet a synthetic brush with a makeup setting spray, and use that to blend the tint.
14. Apply under-eye concealer
You got this. 🙂
15. Set your tint with powder foundation
Set your tint with a matte powder foundation, but don’t apply any on the apples of your cheeks because you’ll be applying a cream blush (and blending a cream blush is easier when there isn’t a layer of powder underneath it).

I prefer to apply the powder foundation using a small pointed face brush because they’re precise, and I can put the powder exactly where I want it, which is usually just on the center of my forehead, down the sides of my nose, right underneath the apples of my cheeks, around my mouth and on my chin.
16. Lipstick!
Apply your opaque creamy peach lipstick to your lips.
17. Lipstick again! (Only this time using it as a cream blush on your cheeks)
Now, put some lipstick on the back of your hand (like in a big swatch), and take whatever tool you used to blend your foundation, and load it with the lipstick on the back of your hand. Then dab — don’t swipe! — it directly on the apples of your cheeks.
18. Optional: Apply another layer of mascara
But if you don’t want to do that, you’re done!
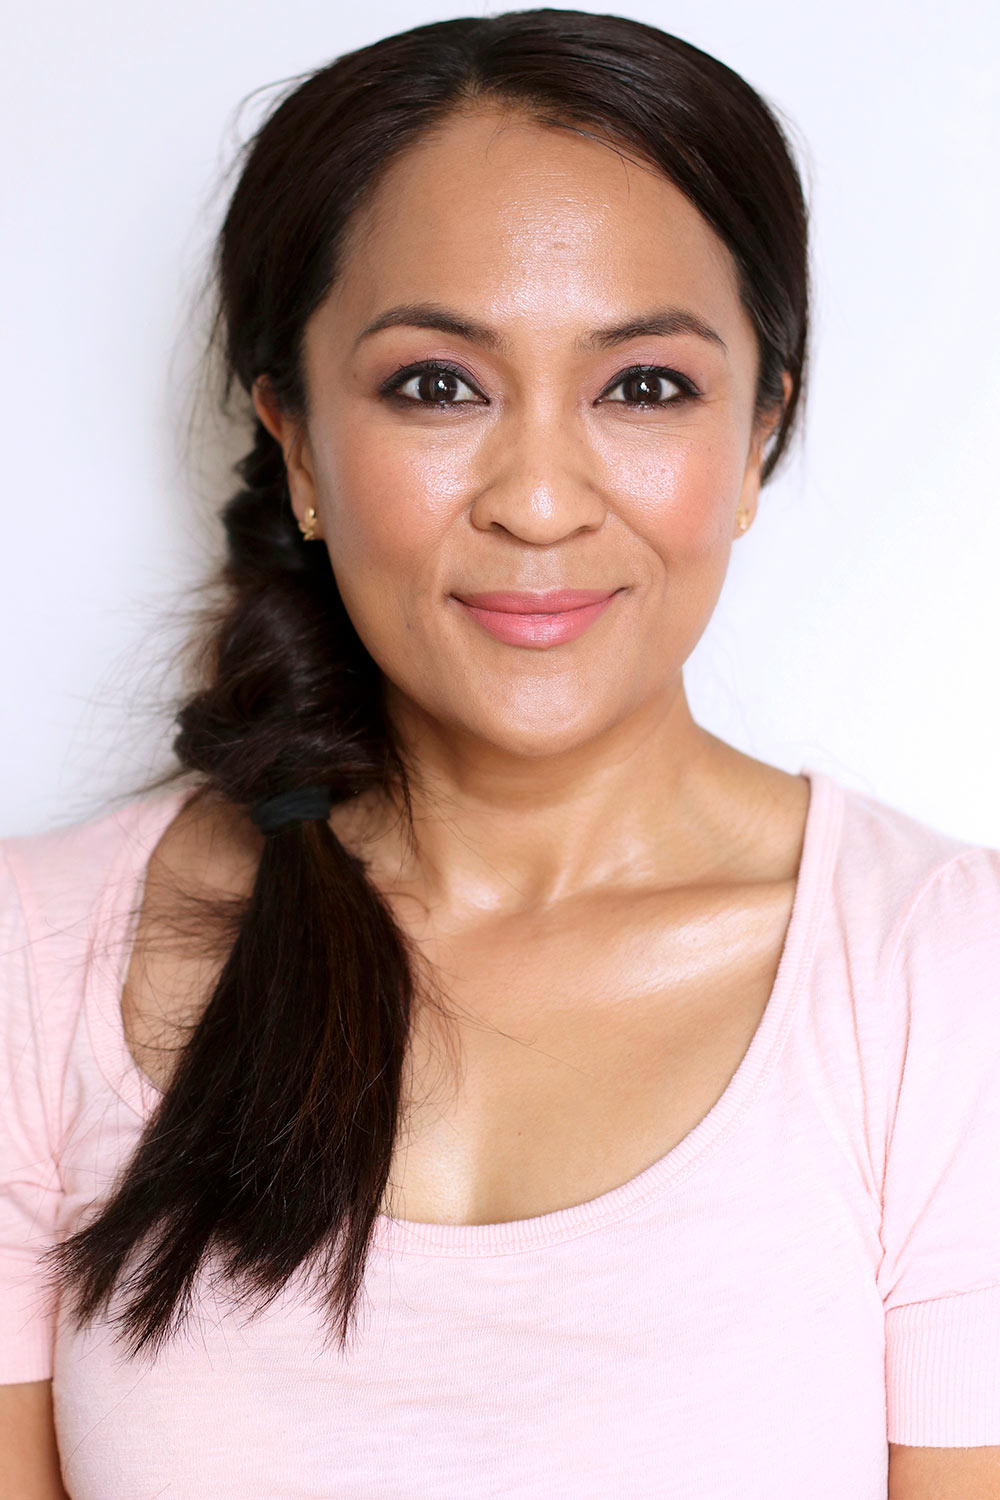
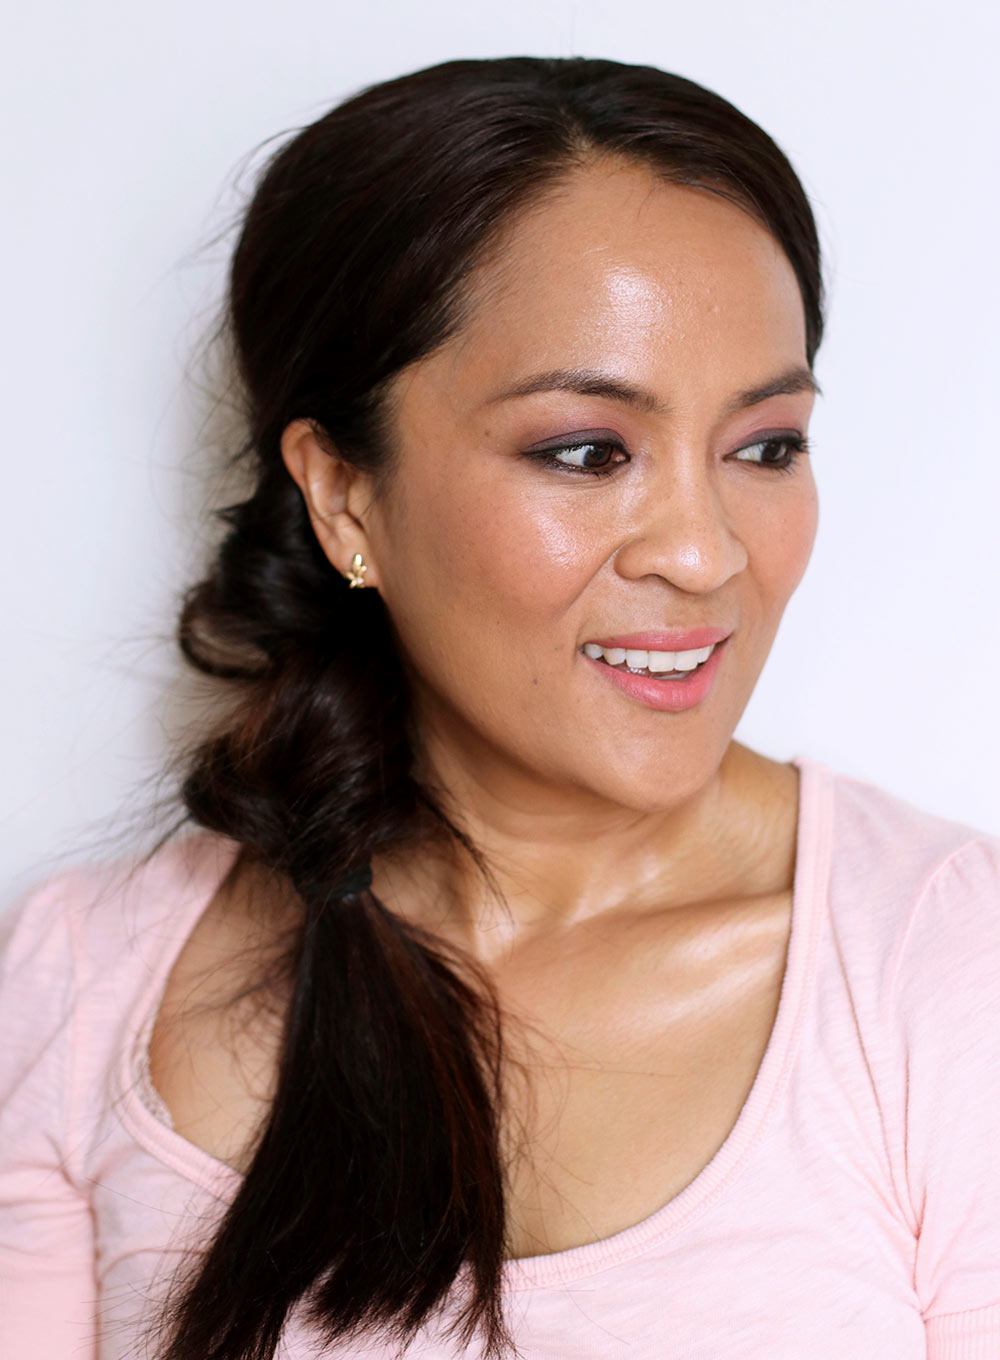
There you have it. 🙂 A soft, romantic monochromatic peach makeup look for Valentine’s, Galentine’s or Meow-entine’s Day!
Your friendly neighborhood beauty addict,
Karen
I love it! Very fresh and springy. I’m inspired to go home and find a peach lippie! 🙂
Ooh, do you have a peach in your collection? I hope so. Remember when you went through your orange phase?
I didn’t have a chance to check last night but I’m going to go through this afternoon. I hope I can find one! 🙂 Totally remember the orange. I was so in love with the ad for the Givenchy quad. HAHA!
PS Did I already ask you if you were going to Bologna in March for Cosmoprof?
This is a very soft and pretty look!
Thanks, Rachel! That’s what I was going for… Glad it translated through the makeup.
Now if only I could cat for Valentine’s Day, LOL!
Do you guys think you’ll be doing anything?
I like this! Thanks for the detailed instructions. I like the idea of smudging the black liner with a bit of shadow. Such a pretty look!
Hi Ruchita,
I’m glad you like this look. 🙂 I hope you give it a try… You might even be able to use your Revlon shadow as a lid base. I think that would be very pretty.
Does Mingy have a Valentine yet?
That’s a great idea! I’ve been using that Revlon shadow fairly often because it’s so quick and easy to use.
Mingy doesn’t have any prospects yet for Valentine’s Day. Now that Louis has joined the family, he’s got some competition! 🙂
Hi Karen
Wow! Amazing tutorial and the look is so fresh and glowing, your cheeks area is so glowing ? Love it !
Could you please share with us more of these very informative tutorials ❤️
Thank you
Hi Bebe,
So glad you like it and sure, I’d love to do more! What kind of looks would you like to see? Let me know and I will see what I can whip up.
I hope you give this look a try. 🙂
I am still hooked on champagne lids and red lips, but you make me crave peaches and soft pinks. Must be the season…
I love this look, not just for V-Day! Brings all the attention to your eyes!
Love love love this look!!!?
MAC Lunar New Year sold out online in minutes without warning of availability. Do you think they’ll re-promote it later this Spring?
Those are my Jam colors! lol
Maybe you have some dupe suggestions for the eyeshadow & lip?
Thank you for sharing?
So pretty on you. Which Real Techniques brush is that you’re using to apply the face tint? Thanks Karen!
Great look but I wish you had used readily available products so we could more easily duplicate the look re: the MAC Lunar New Year collection. Love it otherwise! You look amazing in peaches!
You look so pretty and I love love love the look! Thanks so much for the tutorial!
Karen, I love this look! So gorgeous on you! Thanks for the detailed steps! You had me at all skills can do this. I have Incandescent Electra&Nars O but not a peach cream lip so I appreciate the details of what you use. Eyeliner/shadow my meow-entine can do better than me.. this will be my challenge lol
I adore your pic-tutorials Karen.. thank you!
I’ve been a long time fan, but just finally getting around to letting you know how much I completely enjoy your blog!!!!! You are a fantastic and entertaining writer and give us so much good information and fantastic looks!! I love you girl!! Thank you for a beautiful look!
Love this tutorial so much that I tried it yesterday with some similar colors I had on hand. It came out great. Perfect for work and quick! Thanks.
Hi Kelly,
I’m so happy you like the look! Did you take any pics? I would love to see!
Lol! I DM’d you a photo on IG. I don’t know how people take selfies of eye makeup without looking like a crazy person. You’ve been warned! I used dusty pink paint pot and the times 9 red hot palette. Errrr, not sure on the names… smudged the feline.
I just saw it! You look SO pretty and I love how you blended the colors on your lids. So there’s this rule that you have to take, like, a ton of pics before you get one decent one. For me it’s usually 5-10 shots! It’s hard to take cute selfies, especially with eye makeup. You did a great job!
Absolutely love your eyelook here Karen! And also the wild braid! Lovely! I will try to re-create this eyelook tomorrow! YESSSS!!! Not sure I will look as cute as you do though lol.
I love this look on you, and the step -by-step and way you photographed everything!
Hi Trude,
Thanks, lady! How is new mommy life? I’ve been so happy to see the pics of your darling little girl. Newborns are the sweetest. ❤️
It’s been amazing and super hard but amazing…you know? Today was a tough one, we wound up taking her to the doc because her head cold got way worse, but she’s doing so much better now. The conversations you have post partum are so unexpected, right? Like we had a full convo about her snot. It’s a sharp learning curve but there’s nothing I wouldn’t do for this little lady!
Yes, I totally know. Is your hubs at home with you now to help?
No, he went back to work but his commute is all of 3 minutes so he’s home at lunch and most of the evenings. My parents stayed with us for over a week so that helped us transition. Now that I’m not working it still feels like I’m on vacation, despite the sleep derivation! 🙂