My current fascination with MAC’s Mulch shadow continues, and today I rocked the Mulch once more with a super-easy look that’s great for makeup newbies.
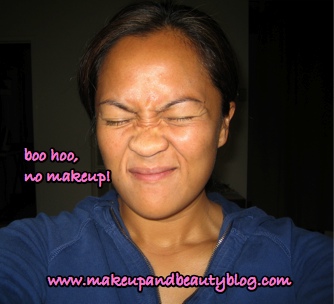
When girls/boys do these makeup tutorials it seems customary to have a mortifying shot of your face without any makeup on it. I don’t even go across the street without any concealer on, ya’ll!
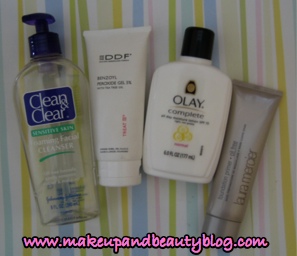
First I prepped my skin by washing it with a gentle cleanser, Clean & Clear. I have acne-prone skin so I put on a thin layer of DDF’s Benzoyl Peroxide with Tea Tree Oil, followed by Olay Complete. After all of this stuff sinks in I put on a thin layer of Laura Mercier Oil-Free foundation all over my face, including my lids.
I’m kind of clumsy, so I like to do eyes first. That way if I totally screw up I don’t have to bother with re-doing foundation, powder, blush, etc. I also do this because inevitably there will always be niblets of shadow all over the place, and I like to swipe the under eye area clean before applying concealer.
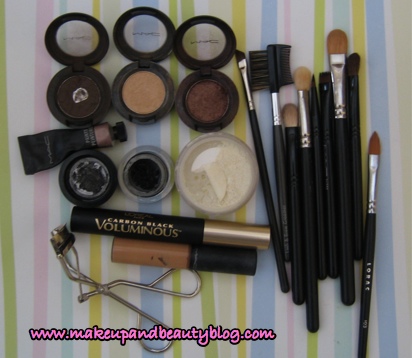
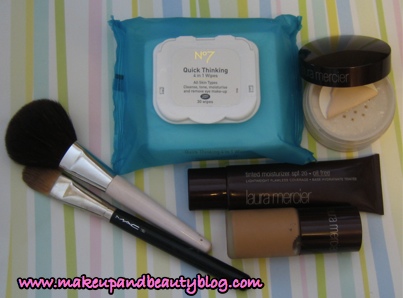
Here’s what I used, from the left to the right going counterclockwise:
– MAC Paint in Magrittes
– MAC Concrete shadow (I use this in my brows)
– MAC Ricepaper shadow
– MAC Mulch shadow
– MAC 266 (stiff angled brush)
– Studio Basics lash and brow comb
– MAC 217SE (blending brush)
– MAC 217 (blending brush)
– MAC 209SE (eyeliner brush)
– MAC 212SE (push brush)
– MAC 252 (laydown brush)
– MAC 275SE (angled fluff brush)
– LORAC 103 (concealer brush)
– Laura Mercier Secret Brightening Powder in #2
– L’Oreal Voluminous Mascara in Carbon Black
– MAC Select Moisturecover in NW 25
– MAC lash curler
– MAC Fluidline in Blacktrack
I used MAC Paint in Magrittes as a lid primer. Magrittes is a really pretty gold, with shimmer. Don’t fear this shimmer — it’s not too disco, I promise.
MAC Paints are creamy and give shadow something to grab onto. I like ‘em because I find it easy to blend shadows with Paints as a base. One caveat: if your lids are oily you may have some product migration if you use Magrittes by itself. One trick to try is to use Urban Decay’s Potion Primer first and then layer Magrittes on afterwards.
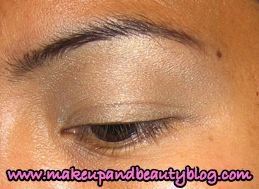
Next I used a 252 brush to apply Ricepaper shadow all over the lid.
Now it’s time to rock the Mulch. I first used the 217 to put a light wash of Mulch all over the lid (from the lash and then upward to just the start of the crease), and then concentrated the color on the outer ends using the 252. Then I blended with the 217 to remove any harsh lines.

Using MAC’s Lash Curler, I the curled my lashes: I placed the curler closed to the base of the lashes and then pulsed the lash curler (not pinched!) as I moved it upwards to the end of the lashes to create a smooth curl.
If you find the lash curler intimidating or scary you are not alone! So if you have long, thick, pretty lashes then you can probably get away with skipping this step and maybe even skipping mascara. It’s really up to you and how comfortable you are.
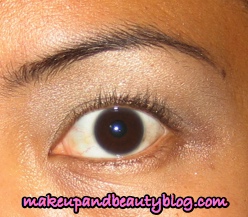
Next I added two layers of L’Oreal Voluminous mascara in Carbon Black. Love. This. Stuff. Side note: see those purple-ish undereye circles? Last night I was sucked into a vaccum of bad late night television, and I stayed up way past my bedtime to watch both “Lindsey Lohan: Hollywood Trainwreck” and “Mission: Man Band,” on VH1, LOLOLOL. Oh, and if you happen to know who “Color Me Badd” is then don’t miss “Man Band.”
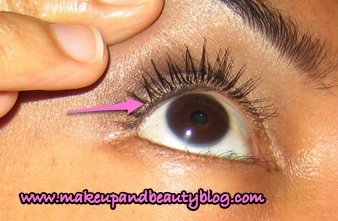
I initially was going to skip liner totally but on a whim decided to use MAC Fluidline in Blacktrack to line the outer-upper-lash line. I used a 212 push brush, but the 209 liner brush is a good option, too. I only lined the outer two-thirds because I didn’t want it to look too obvious. This trick is awesome — it totally makes your upper lashes look thicker.
After I finished with shadow and before I applied concealer did a quick cleaned up of my underye area with Boot’s No. 7 Quick Thinking cleansing wipes.
Remember those purple-lish undereye circles? Well, some MAC Select Moisturecover applied with a Lorac concealer brush helps to remedy the situation by leaps and bounds. I set it by applying Laura Mercier Secret Brightening Powder in #2 with the 217SE. THANK YE GODS FOR CONCEALER!
Now the eyes are done, yay!
Now onto foundation and powder.
I mixed together Laura Mercier Oil-Free Tinted Moisturizer in Almond with Laura Mercier Oil-Free Foundation in Suntan Beige and applied the mix with a MAC 190 foundation brush. I don’t like to feel like I’m spackling on the foundation, so I apply just a light layer on to even out the red spots around my nose and to even out the my skin tone. I then set it all over with Laura Mercier Translucent Loose Setting Powder using a Sonia Kashuk powder brush.
Whew … almost there!
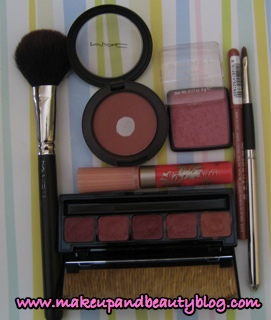
Lastly I do cheeks and lips. Here’s what I used from left to right:
– MAC 129 blush brush
– MAC Blushbaby blush
– Rimmel Pink Rose blush
– Rimmel 1000 Kisses Lipliner in Tiramisu
– MAC 316 Lip Brush
– Bobbi Brown Beige Lipstick, from the Best Of lip palette
– Paul & Joe Lipgloss in #10

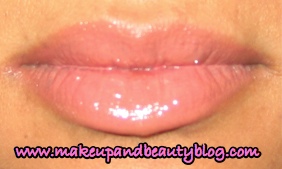
For lips I lined with Rimmel’s 1000 Kisses Lipliner in Tiramisu and then used my finger to blend the color in.
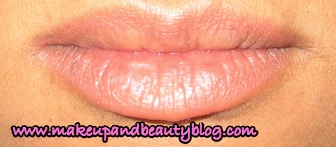
I then added a layer of Bobbi Brown Beige lipstick and topped it off with Paul & Joe Lipgloss, using a MAC 316 lip brush.
I used a MAC 129 to apply Blushbaby on the cheeks and to blend the color upwards toward my ears. I then put a pop of pink shimmer with Rimmel’s Pink Rose blush on the apples only.
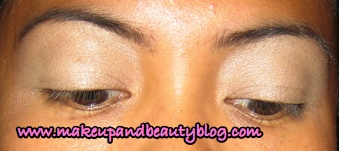
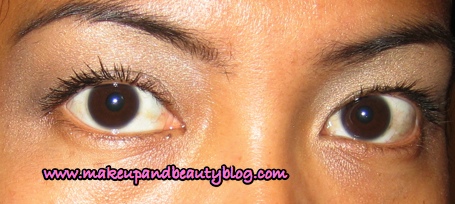
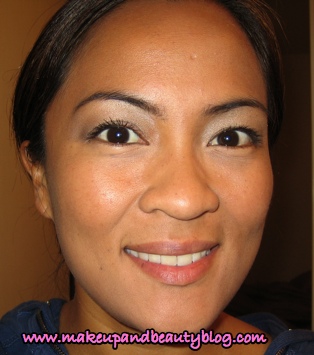
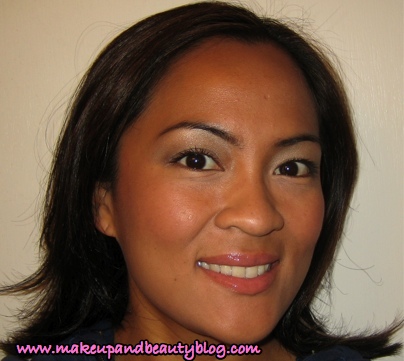
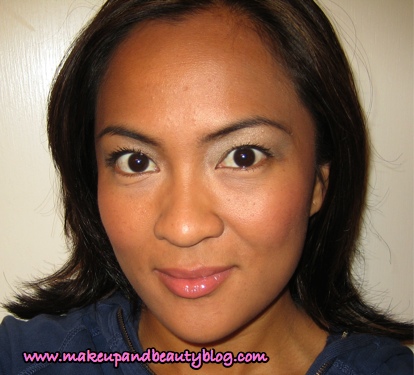
Voila! Here’s the final look, without and with the flash.
Crap, now I have to clean up …

I usually don’t like to write with music on but because this post was so pic-heavy I spent most of my time working with the pics and listening to this song by Robin Thicke and Pharrell. It’s called “Wanna Love You Girl” and it totally makes me want to dance. Give it a listen – it’ll be like we’re hanging out together and talking shop about makeup, LOL.
You better be working it today because it’s FRIDAY!
Your friendly neighborhood beauty addict,
Karen
I love the look… subtle yet bright. GIrrl, I do not leave my house w/o foundation EVER!!!
LOL, Apple Diva! It pained me it put that picture up. But hey, when in Rome …
The lips look great!
Thanks Erika! =)
karen great job! i love the liner tip about ‘tightling’ or lining the upper lash line. tuts are so tedious to put together. this one was fantastic. the mac #129 and sonia kashuk powder brushes are so mine! they look heavenly.
the pharrell song? keeps you in your makeup groove. color me badd? i’ll have to check out the show.
lastly, lol lately… since i do my makeup in all types of places. i’ll take everything out and organize like you did… then once i’m done with my eyes, i put up those tools, and so on until everything is put back in it’s compartment of my makeup bag. uhh yeh, a kit like that.. goes with me most places =( excluding loose powder and wipes… amazingly it all fits in a travel toiletry bag.
Hi Kia, I totally need some tips on makeup organization, so thanks for the tip! I put on my makuep in all types of places too, LOL.
Anyway, regarding brushes … the MAC #129 is well worth the investment. I use it all the time as both a blush brush and a bronzer brush. It’s the perfect size for the apples of the cheeks. The Sonia Kashuk powder brush is good for the money. I wish it was a little softer, but it gets the job done well!
I want you to do a tutorial soon! I would love some tips on how to be braver and more comfortable with color on the eyes!