
I LOVE LOVE LOVE MAC brushes. I can’t get enough of them, and I always find a reason to justify getting just one more brush. And just ’cause I can, here’s the list of all of the MAC brushes I’m jonesing for!
So … what’s on your brush lust list?
Makeup and Beauty Blog | Makeup Reviews, Swatches and How-To Makeup![]()
A beauty blog blooming with fresh makeup reviews, swatches and beauty tips from your friendly neighborhood beauty addict
I LOVE LOVE LOVE MAC brushes. I can’t get enough of them, and I always find a reason to justify getting just one more brush. And just ’cause I can, here’s the list of all of the MAC brushes I’m jonesing for!
So … what’s on your brush lust list?
 Product: MAC Select Moisturecover concealer in NW 25
Use: To cover dark circles
Price: $15.50 for a tube
Makeup and Beauty Blog Rating: B
This weekend I finally picked up some MAC concealer, Select Moisturecover in NW 25.
Select Moisturecover is the latest addition to my concealer arsenal. I’m a concealer junkie, and currently I’m rotating Make Up Forever’s Lift Concealer in Dark Beige 2 with Biotherm’s Forget It Concealer in 30.
I decided to try using a pink-toned concealer because at the MAC seminar I attended a few weeks ago, the instructor told us that most people (even those with yellow undertones) should wear a pink-based concealer underneath their eyes. Also, in this month’s Allure there’s a brief feature on Bobbi Brown, and she suggests wearing a pink-based concealer underneath a yellow-based concealer.
I really like the color of Select Moisturecover concealer on my skin. I was afraid that the pink tones would make it look obvious, but the pink tones really seem to cancel out the dark circles. It has a good consistency — not too thick, not too thin — and I like the doe foot applicator. Plus, when I blend it in with the 252 Large Shader Brush it looks great!
However, the looking great part doesn’t seem to last long. Unlike Biotherm or Make Up Forever’s concealers, which don’t budge and can last throughout a sweaty dance class, within a few hours I Select Moisturecover starts to slip off my face. Ugh! My concealer quest continues.
The fact that I can make it work when I layer one of my other concealers over it saves this concealer from a lower rating. I plan on keeping it because I like the color so much.
If your skin isn’t as oily as mine you might really like this concealer. And if you’ve got dark circles then you might want to try a pink-toned concealer, I think it really works wonders.
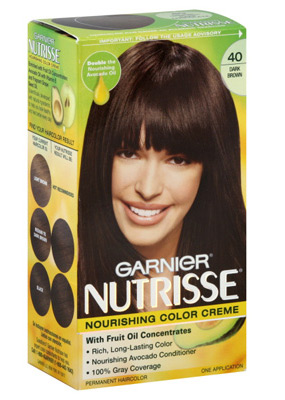
Product: Garnier Nutrisse Permanent Color
Use: At home color to change your current color or cover up grays
Price: about $7.00 for a one application box
Makeup and Beauty Blog Rating: A
I can justify spending $75 on a haircut because I have naturally wavy hair that’s really hard to tame — I’ve had so many bad haircuts resulting in everything from the poofy mushroom to the rats nest look at, so I never skimp on getting a good haircuts.
Throughout my 20s and early 30s, I was also willing to spend money on salon color. I went through all sorts of hair color phases, changing my naturally brown-black hair with red highlights, light brown and blonde highlights. It’s so much fun to change your hair color, but now that I’m living on a writer’s paycheck it’s really hard to part with $120 every three months to get those roots done, especially when the do-it-yourself color boxes at the store are $7.00.
During my year of living cheaply (wait, what am I talking about, I’m still living cheaply) I gave up getting my hair colored at the salon. I was a little nervous about doing it at first because the last time I did at-home hair color was in high school. I mean, what if my hair turned orange? Or what if I accidentally fried it somehow and it started breaking off? Or what if I ended up with scary too-dark Halloween hair that looked like an Elvira-Mistress-Of-The-Night wig? The mishap possibilities were endless.
I wish I could say that it all went perfectly from the get-go, but I can’t. Like with any new skill, I made a few mistakes along the way but thank god it didn’t really result in anything too horrific. One time I started from the roots because I got really freaked out about seeing gray hairs at the front of my head, so I piled on globs of dye on the roots like a crazy person and I ended up with light roots and dark ends. And another time I used a too-dark color that I left in too long which resulted in scary dark Elvira-Halloween hair for about a week until most of the color washed out. But in the grand scheme of things, these mistakes weren’t *that* bad. They weren’t noticeable to the majority of bystanders, unless I pointed it out (which of course I didn’t).
Now I color my hair every month, and it’s as easy as pie. I use Garnier Fructis Permanent Hair color. The smell is pretty strong, but in comparison to other at-home dyes, it’s not bad. It also doesn’t dry my hair out, which is one thing I hated most about Feria, the dye I used in high school. If you have dark hair like me and want to go a few shades lighter, Garnier is a good choice, because it does a pretty good job of lifting your hair color a few shades.
Here what I do to make at home hair color work for me:
2. I then let my hair air dry during the day so that I can dye my hair in the evening.
3. When it’s time to dye, I put on an old t-shirt and sweatpants so I don’t ruin any nice clothing. I also grab an old wash cloth and wet it. I use this to immediately wipe any dye that accidentally gets on my face or my neck. I don’t have to use this as much now, because I’m getting less messy with practice.
4. Garnier gives an estimated time of how long you should leave the color in. I start the clock the moment I being the coloring process. If the box says 35 minutes, then I take into account total dye time from start to finish. I do not dye my hair and then wait for 35 minutes, and the one time I did, the color ended up being too dark, which resulted in the Elvira-Halloween hair mishap. Ugh!
5. If I’m using a new color, I always start from the ends and put the color on the roots last.
6. I never pile the hair on top of my head while I’m coloring. I just let it hang down (hence the wearing of the crappy t-shirt).
I know some people who will only use a certain brand for all of their makeup products, but I like to use a mix of high-end and drugstore makeup. I’m really picky about what products I spend my money on, so while I’m willing to pay more for products like powders, concealers and brushes, I’ll spend less on things like blushes, cleansers and lipliner. Ultimately whatever products are worth my hard-earned cash do the same three things: perform well for the price, complement my coloring and don’t break me out.
One makeup staple that I usually don’t spend a lot of money on is mascara. The shelf life of a tube of mascara after it’s opened is three months, so if you’re good about replacing it every three months, that’s four tubes a year at the minimum. And if you buy your mascara from Sephora or from the makeup counter chances are you’re spending from $20-40 a pop – that’s $80 worth of mascara every year, ya’ll!
Besides its short life span, another reason I don’t spend lots of money on mascara is that even though I’ve tried several high-end mascaras by Dior, MAC, Bourjois, Lancome and Clinique (just to name a few), I’ve still yet to find one that I think is worth paying a lot of money for because drugstore mascaras work just as well. (Sidenote: This weekend I’m going to pick up a tube of Benefit’s Bad Gal lash in blue, so we’ll see if that statement changes.)
The closest I’ve ever come to high-end mascara nirvana is Diorshow, but it’s $23, and I think Max Factor’s 2000 Calorie mascara works just as well (if not better) for only $6.00.
In fact, my two current favorite drugstore mascaras are all by Max Factor: 2000 Calorie and Stretch & Separate. Each provides a different look and great performance for the price. Color selection is somewhat limited, so if you like crazy colors then they might not be your cup o’ tea.

Product: Max Factor 2000 Calorie Mascara Straight Brush in Rich Black
Use: Volume
Price: about $6.00
Makeup and Beauty Blog Rating: A+
This mascara is my everyday, go-to mascara, and it SERIOUSLY. ROCKS. MY. WORLD. It thickens the lashes without clumping, and two coats make a dramatic difference without looking spidery. This performs similar to Diorshow, except that it’s even better than Diorshow because it doesn’t smudge. It comes in four colors: Rich Black, Soft Black, Black Brown and Deep Auburn. ROCKS!

Product: Max Factor Stretch & Separate Mascara in Deep Blue and in Rich Black
Use: Length
Price: about $6.00
Makeup and Beauty Blog Rating: Deep Blue – B+, Rich Black – A-
The marketing people weren’t messing around when they named this mascara; it indeed lengthens and separates very well, and does so without clumping or smudging. Whenever I wear this mascara I feel like a ’40s film star because it makes my lashes super long. This would get an A but the blue isn’t really that blue. It shows up as black on me. Also, my lashes aren’t super thick, and this formula doesn’t provide enough volume. If you have really thick lashes then you might really love this. Comes in: Rich Black, Deep Blue, Soft Black and Black Brown.
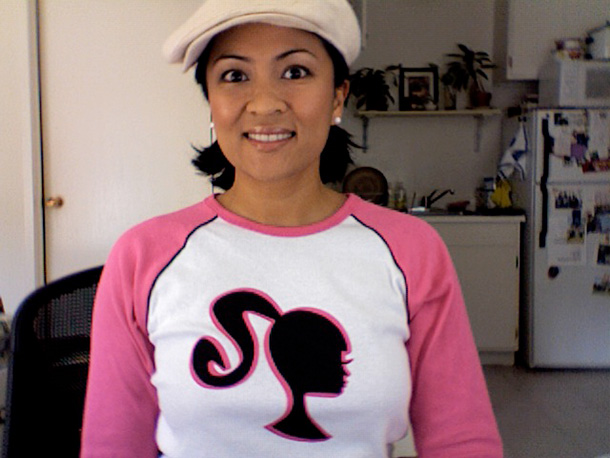
Remember that song from the 90s by En Vogue, “Never Gonna Get It”? That’s how I feel about my current Barbie Loves MAC T-Shirt situation. I was really hoping to snag one of these cute tees because they’re so cute, so pink and so my style! So when I went to the site a month ago and saw that they still had them available online I jumped on it and purchased one. A few hours later I got an e-mail from MAC saying that the shirts were on backorder, and that they’d ship me one once they had enough stock. (And ironically, the e-mail was signed by a service rep named Barbie, ha ha ha.)
This past Friday (and one month later) I got another e-mail from MAC saying they still can’t ship the shirt, and if after 30 days they can’t fulfill the order, they’ll have to cancel the order unless I write them and tell them to keep the item beyond 30 days. ARGH! I’m never gonna get this shirt!
(UPDATE: As you can see, I eventually got the shirt!!! 🙂 )
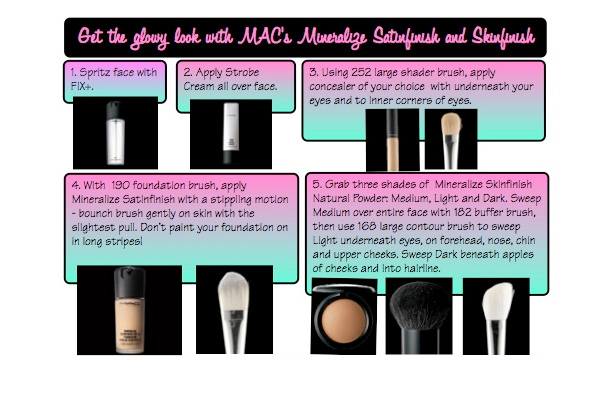
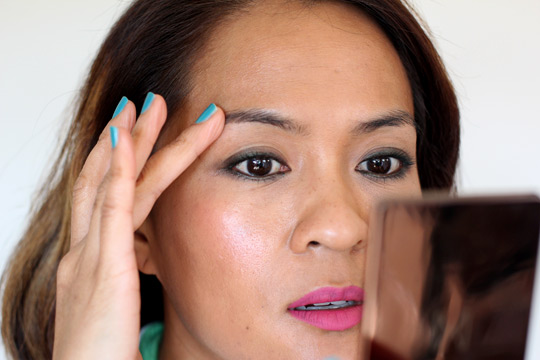
This weekend I headed over the MAC counter to try the new Mineralize Satinfinish foundation and the artist who worked on me showed me how to use the Mineralize products to get a glowy, J. Lo look. I like having the added dimension of some shimmer in comparison to a flat, matte, look, but I have pretty oily skin so I’m really picky about what shimmer products I use; otherwise, I end up looking like a greasy disco ball if there’s too much glitter. If you like the foundation and the powder consider taking these extra steps because the finished look is really pretty. It gives just enough glow without being too over the top.
Here’s a step-by-step tutorial on what she did and the products she used:
2. She then used the 190 Foundation Brush to apply Strobe Cream over my entire face. You don’t have to use the brush to apply this cream; if you don’t have one just use your fingers.
3. She then mixed Fast Response Eye Cream with Select Moisturecover concealer, and then applied the mixture with the 252 Large Shader Brush. (Although I liked the texture of concealer mixed with eye cream, I didn’t think it gave me enough under eye coverage, so if I were to repeat this look again I’d leave out dilution of the concealer.)
4. She then pumped some Mineralize Satinfinish SPF 15 Foundation onto a Petri dish. (MAC artists sometimes use Petri dishes because the glass doesn’t transfer bacteria. You can pump the foundation onto the back of your hand, just make sure you either wash them really well or use Purell before putting products like foundation — or any other product – on the back of your hands to avoid transferring bacteria onto your face.) She then used the 190 Foundation Brush to apply Mineralize Satinfinish with a stippling motion onto my face. To stipple, you take the brush (hold it towards the end, like a chopstick) and bounce it gently on your skin and give it the slightest pull. Whatever you do, don’t paint your foundation on in long stripes.
5. She then grabbed three shades of Mineralize Skinfinish Natural Powder: Medium, Light and Dark. She applied Medium over my entire face with the 182 Buffer Brush. She then applied Light with the 168 Large Contour Brush to highlight underneath my eyes, across the forehead, down the nose, on the chin and then across the tops of my cheeks. With the same brush, she then contoured my cheeks by applying the Dark shade underneath the apples of my cheeks and up into the hairline.
Voila! You’ve got the glowy look! Watch out, J. Lo! 🙂
Here’s the last of the tips and tricks from my technique binder.

More handy dandy tips from the Barbie Loves MAC Seminar!
Your friendly neighborhood beauty addict,
Karen