If you’re heading back to school this fall, chances are you’ll have to make some timely decisions before you start. Some will be important, like what classes you’re going to take, whether you’ll join band again (all I have to say is BAND GEEKS 4 LIFE!) or whether you can finagle a ride home from a car-owning friend because you don’t have the wherewithal to brave the school bus. (The buses at my school were exactly like Thunderdome! Freshman year in high school, a mean girl almost poured a can of soda on my hair; thankfully, my friend stopped her.)
Other decisions, like figuring out what makeup to wear on picture day, seem like small potatoes by comparison, and yeah, in the grand scheme of your entire school experience, picking a lip color (bold or neutral?) seems pretty lame, but do you really want to look back at your picture in the yearbook and cringe? GIRL, I’ve done this, and trust me, it’ll be hilarious in about 20 years, but for the timebeing, it kind of sucks.
So! Here are some things to help you take your most brilliant pic on picture day. This step-by-step tutorial will walk you through a back-to-school picture day look that everyone, even makeup beginners, can handle. When you’re done, you’ll still look like yourself, just a little more polished, and the results should look great on camera.

And even if you aren’t heading back to school this month, you can still do this look. It’s a good one for all kinds of picture occasions, like I.D. pics, or perhaps if you’re doing a headshot, or if you’re going to an event and you want to look sharp but not completely over the top.
If you’re ready, let’s start!
1. Find a window
When you’re putting on makeup for pictures, it’s really, REALLY important to have good light, and natural light, like from a large window, is fantastic for this. It’s big, bright and diffused, so find a window, and set up shop next to it (but sit in the shade, not direct sunlight).
2. Apply primer
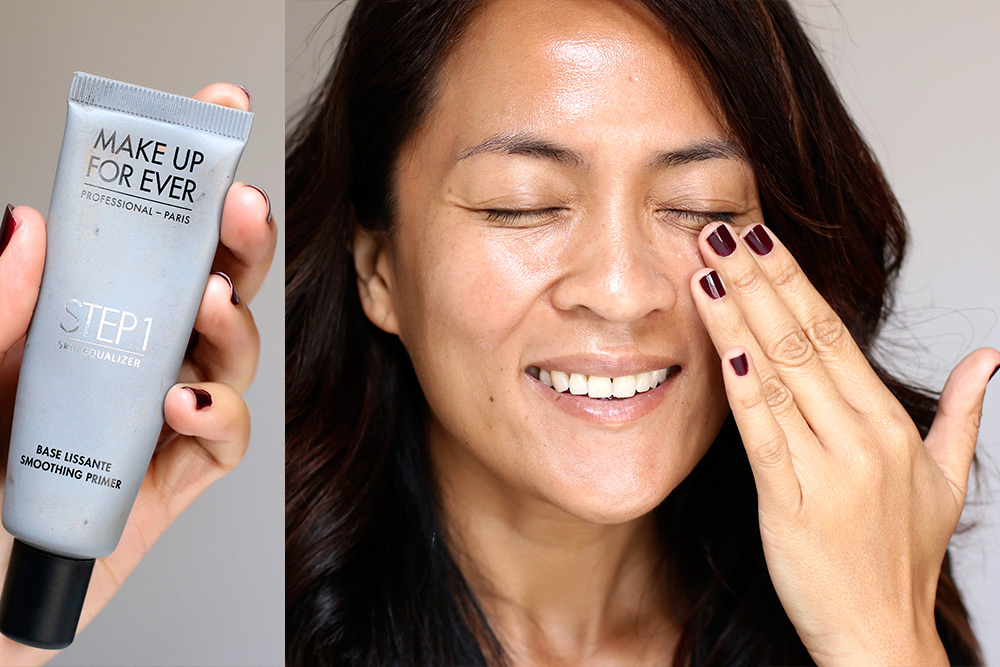
You’ll want your skin to look smooth and your foundation to appear even, so start by applying a primer all over your face and on your lids.
If you haven’t used makeup primer before, it works a little like paint primer by filling in the tiny gaps and lines on the surface of your skin so that products layered on top of it look smooth and even.
It also has the added bonus of helping your makeup last longer, and since you’ll probably also be doing a number of other things on picture day, like picking up your schedule or getting books, you’ll want your makeup to stick around.
Don’t worry if you usually skip primer in your regular makeup routine. If you don’t want to buy one just for picture day, head to a beauty store or counter, and ask for a sample. 🙂
3. Apply a matte foundation

You want to apply a flat matte with absolutely no shine, because chances are the photographer will be using a flash. When flashes are involved, matte foundation is a must, because flashes have a habit of making shiny finishes look extra super-duper shiny, which can lead to oily-looking skin in your pics. Generally, however, it helps to avoid matte foundations containing SPF because they can result in a white cast on your skin when the flash fires.
Now, this isn’t a hard and fast rule, because I have used and worn many matte foundations with SPF that still looked fine in photographs, but I would steer clear of anything with titanium dioxide or very high SPF.
Also, if you need to, conceal any dark circles and blemishes in this step.
4. Set your foundation with a matte powder

To help your skin look as matte as possible, and to help your foundation last and last, set it with a matte powder.
5. Apply matte bronzer and blush

Matte foundations look great in pics, but by evening out the natural colors and contours in your skin, all foundations can make your face look one-dimensional, which is why you’ll want to build back in some warmth, natural contours and to simulate shadows. One way to do that is with bronzer just beneath your cheekbones, across the bridge of your nose and around the edge of your face.
Then, blend a blush onto the apples of your cheeks, and I like peachy pink blushes for this because they add color without overwhelming the face.
Again, with both the blush and the bronzer, you’ll want a matte finish.
If you’re wondering if you need to contour…well, in my opinion, I say skip it. Contouring has been a beauty buzz word for a couple years, and it seems like everyone is doing it, but it’s one of those things that you really have to get spot-on for it to look right in pics. It can look totally wackadoo if it’s even just a little bit off. If you’re confident in your contouring skills, go for it! — but if you have any sort of hesitation at all, I say skip it, and just do a quick bronzing instead.
6. Fill in those brows

Fill in those brows, girl, even if it’s something you never do. There’s an old saying that brows frame the face, and they really do. Things can look off in pictures if your brows aren’t filled in. Plus, bright photo flashes can make light-colored brows practically disappear in pics (filling your brows in can prevent this).
Don’t worry if your brows look too full or a little cray at this point. It’ll all come together in the end.
7. Apply two different shades of eyeshadow

For this look, you’ll want to emphasize your eyes, but still look like yourself, so you might want to save the sooty, smoky eyes and falsies for prom or homecoming. They can be a little much for a school pic.
Here’s a simple formula I like to follow with eye makeup when it comes to pictures: use two eyeshadows, one liner and mascara. It doesn’t take too long to do, and it gets the job done.
For your eyeshadow, look for two shades — one darker than the other to define your lids and crease (I recommend a neutral brown or taupe two shades darker than your natural skin tone…but I’m a neutrals gal), and one lighter shade that you’ll use to highlight your brow bone. I like matte or satin finishes for both of them.
If you’ve got your heart set on wearing a bright color instead, DO IT! Just be sure you can handle blending everything out. 🙂
To start the eyes, apply your darker eyeshadow onto your lids and in your crease with a flat eyeshadow brush. Next, blend out the edges with a fluffy tapered brush. Then, dip a flat eyeshadow brush into the lighter shade, and apply it to your brow bone.
Keep in mind that the flash will likely lighten up the color (sometimes A LOT), so you can go a little heavier on the application (both for your eyes and when you do your cheeks). In other words, you can apply a little more than you’d wear for your regular day-to-day makeup.
8. Line your eyes with liner
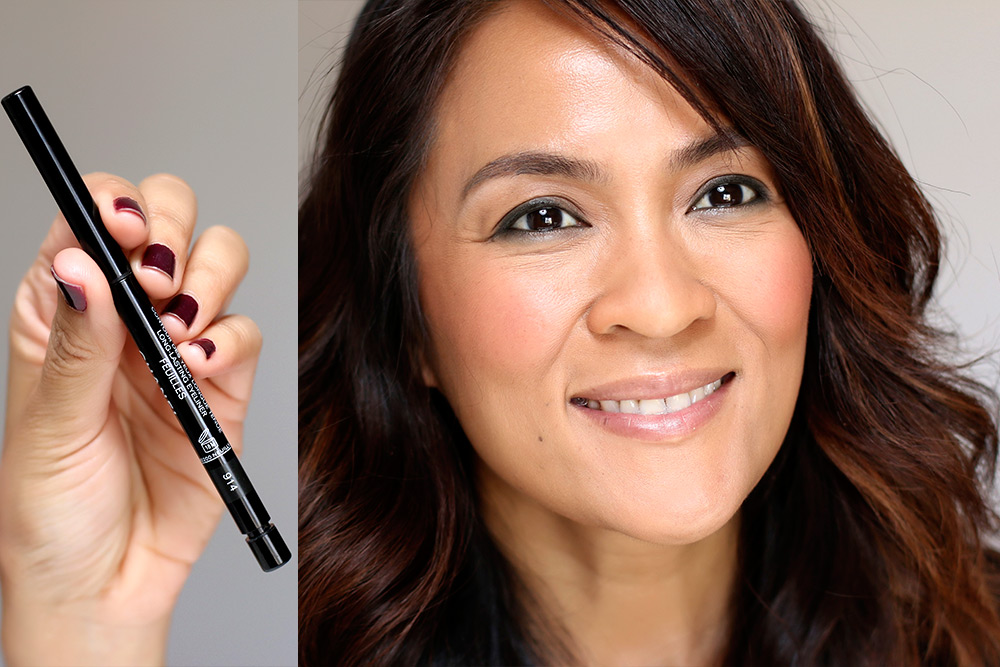
Even if liner isn’t something you wear all the time, I recommend that you wear it for pics. It draws attention to the eyes, makes your lashes look thicker, and it’s generally very flattering in pics.
Grab either a black or brown pencil liner — something that you can smudge a little — and draw a very thin line along along your upper lashes, and maybe your lower lashes, too, if you’re comfortable with that. Soften the edge with a Q-tip or an eyeshadow brush because sharp lines can look very harsh in pics.
9. Coat your lashes with mascara

Curl your lashes if you need to, and then grab a black mascara and coat your upper and lower lashes.
Yup, black! I suggest wearing black for picture day, even if black mascara isn’t your thing, because it just photographs so well. Remember how the flash lightens colors and blows them out? It’ll happen here, too, but a really dark mascara will still look natural in pics.
10. Finish with lipstick
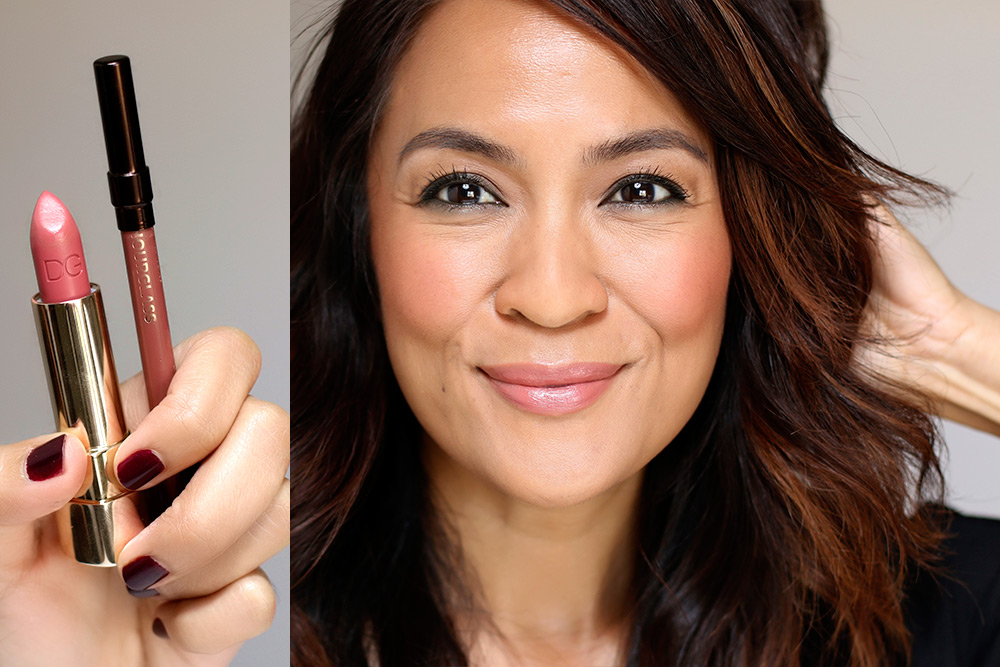
Finish your look by applying lipstick. The shade is totally up to you. If you’re a red lip gal, and that’s your signature look, work that crimson! If you’re going to do red or any other bold color, though, I’d definitely grab a lip liner and a lip brush, because you want your lips to look as perfect as possible in pics, and it’s hard to hide any application boo-boos when you use a bold lip color.
For this look here, I went with a rosy pink slightly darker than my natural lip color (about 2-3 shades darker). It’s almost a nude lip look, which I think is really flattering in pictures.
Lips, I think, are an area where you can play with shine. A cream lipstick formula, or a satin lipstick with a touch of gloss in the center of the lips, photographs well. I’d be cautious about applying gloss all over your lips, though, because I think it can be a little distracting sometimes. It focuses attention squarely on your lips when you want all eyes on the overall you!

Lastly, before you leave for school, prep a makeup touch-up bag so you can do any last-minute adjustments if you need to be before your pic. Include…
- A compact with a mirror
- A matte powder with a brush and/or oil-blotting papers
- Lipstick and/or gloss
- Liner (just in case you applied it to your water lines, and it fades a little)
- Q-tips to clean up any smudges
Have a great school year, friend! 🙂 This one’s going to be amazing; I just know it.
Makeup worn in this tutorial
Primer — Make Up For Ever Step 1 Smoothing Primer
Matte foundation — Diorskin Nude Air in 040
Matte powder — Chanel Natural Finish Loose Powder
Bronzer and Blush — Rimmel Natural Bronzer in Sun Bronze and Clinique Cheek Pop in Ginger Pop
Brow filler — Urban Decay Brow Beater in Dark
Eyeshadow — Tom Ford Cocoa Mirage Quad, light brown and beige shades
Liner — Chanel Waterproof Liner in 914 Feuilles
Mascara — Chanel Le Volume de Chanel in 10 Black
Lip Liner and Lipstick — Hourglass Lip Liner in Eden and Dolce Gabbana Lipstick in Gentle Monica
Your friendly neighborhood beauty addict,
Karen
So pretty! I wish you had been there when I was still in school…
I remember that for my senior year in high-school, picture day was on Mardi Gras, and we were all wearing costumes. I was a little demon with red horns, and I wore a black smokey and red lipstick. Coolest school pic ever!
I wish I had these tips when I was in school. All of my pictures look like a frizzy shiny mess! On the other hand, I love your hair! Like thinking about showing this pic to my SIL who just graduated from hair school to see if she can recreate this for me.
Hi Judy,
How lucky you are to have a SIL who can do your hair! I used a 1 1/4″ curling iron (the Soft Curl one by ghd) and loosely curled the bottom half of the hair, leaving the ends straight. When she does your hair send me a pic! I want to see 🙂
I love this look! You are so beautiful! This is my daily makeup look. I like that it looks very refined and natural-ish (sorry making up new words here lol)
I wish I had you back in ’97 for my senior pics (dang I’m old). I think I just had eyeliner and lipstick. P.s. Karen can you review Marc Jacobs’ remarcable foundation? Thanks in advance.
Hi Ruth,
I’ll put it on my list to check out next time I hit up Sephora. 😉 I hope they have samples so I can check it out!
Where were you when I was in HS?! It wasn’t that long ago…1990s! 😀
This was a great article for anyone about to take any kind of photo! Thanks, Karen!
Hi Lauren,
I went to high school in the ’90s too! When did you graduate? I was class of 1993, eek! Feels like it was just yesterday.
Us 90s girls are the best! Good times..no cells, etc. I graduated in 1996, but this year has made me feel like I graduated in 1896!! 🙂
Even though I am well past school age, I love these tips. I’m going to try to incorporate them into my makeup routine when I need to look polished but not over the top. I’m even going to forward this to my daughter who is out of school now, but doing job interviews.
Hi Tatiana,
If you do this look please send me a pic! I would love to see it.
Oh, and tell your daughter good luck on your interviews! What field is she pursuing?
aahh karen, you look suuuper stunning here! Flawless & Fresh!
But if you have to choose, which loose powder you love the most? Chanel that you use in here or Urban Decay Naked Loose Powder?
Thanks Karen!
Hi Angie,
Thanks, sweetpea! 🙂
I like both of those powders and think they’re great. I do think, though, that the Urban Decay Naked Loose is slightly better at oil control. It has a flatter matte finish compared to the Chanel. You can’t do wrong with either, but I think if you have oily skin, you’ll like the UD one more. HTH, and let me know if you have any other questions about the products!
aww Karen thank you so much for replying!?
i have oily skin so I think I will choose the UD loose powder!
You sure are picture perfect! Love everything about this look and your hair looks fabulous! Love the nail polish color too!
Hello Agata! Happy to see you as always. 🙂 And thank you for the nice compliments. The nail polish, by the way, is Essie’s In the Lobby. I’ve been wearing it since Sunday with a base and top coat, and have had very little chipping on the edges. For a dark polish it’s great.
Happy Wednesday to you. Are you working today?
I was working today but only 5 hrs since it’s my day off technically but a few hours of OT is nice. After work I went for a walk to a new coffee place downtown where I live now, had a waffle and a cup of coffee then sat my the river for a little bit and walked back home. A nice 3 mile walk!
I was at Rite Aid yesterday and they had the new Essie Fall collection and I actually almost bought In the Lobby 🙂 And now you say that’s what you’re wearing. I will have to go back and get it then.
Beautiful, as always! Not to sound old and curmudgeonly but kids have it so much easier today in terms of access to good info like this. How many school pics could have been rescued/improved if we’d had these tips back in the day? 🙂
Thanks, Kim. 🙂 I agree — amazing how easy it is to get information now! Back in the day google consisted of asking you friends about something in the car on the way to school, haha! Nobody actually knew anything, though, which is the funny part.
Are the boys started school yet? I can’t believe it’s that time already. Where did the summer go?
Where were you when I was in high school?! These are great tips. Even for us “old heads” these tips come in handy 🙂
Thanks lady! Le sigh, all my high school pictures are funky. I wish someone would’ve pulled me aside freshman year and told me to blot my forehead, LOL!
Is it Wednesday already? This week is going by so fast. What are you up to today?
I’m actually preparing to go out of town to visit one of my besties & her family. I’m super stoked. The trip is part business but I’ll be there for a week & I can’t wait to relax & unwind. And, yes, it is Wednesday. Though I feel like this week has been sooooo long. I need to take one of those walks that you took yesterday. Maybe I’ll get the chance to do that while I’m away. Fingers crossed ?
Great post! Thanks for breaking down all the steps! 🙂
You’re welcome, Genesis! I hope you found this helpful. Let me know if you have any more questions about any of the steps. Always happy to help.
Great tips, Karen! (wish I would have had them for my picture days) 😉
I wish you had been there when my pictures were taken. Or that I had known the slightest bit about makeup…
Love these tips! I have to put together a lovely look for my engagement photos in Nov… Definitely needed some camera ready advice 😉
Hi Karen,
My daughter has her Senior picture tomorrow and we have had hair done and keep changing the outfit( her, not me) so this article is very timely.
I enjoy your sense of humor and your love for nature and animals, you give out positive vibes!
best
Ilene
This is one of my favorite posts. I absolutely love this makeup tutorial. Karen, you look flawless and fresh. Thanks for encouraging us!
Cheers,
Cherie
Love that look! And I must buy that lipstick, wow! Wish I had this help in high school, 80’s girl here… Anyone remember melting your black eye liner with a lighter before using it under your eyes! The horror, the horror of 80’s makeup advice! :)))